
Showing posts with label Green. Show all posts
Showing posts with label Green. Show all posts
Wednesday, April 2, 2014
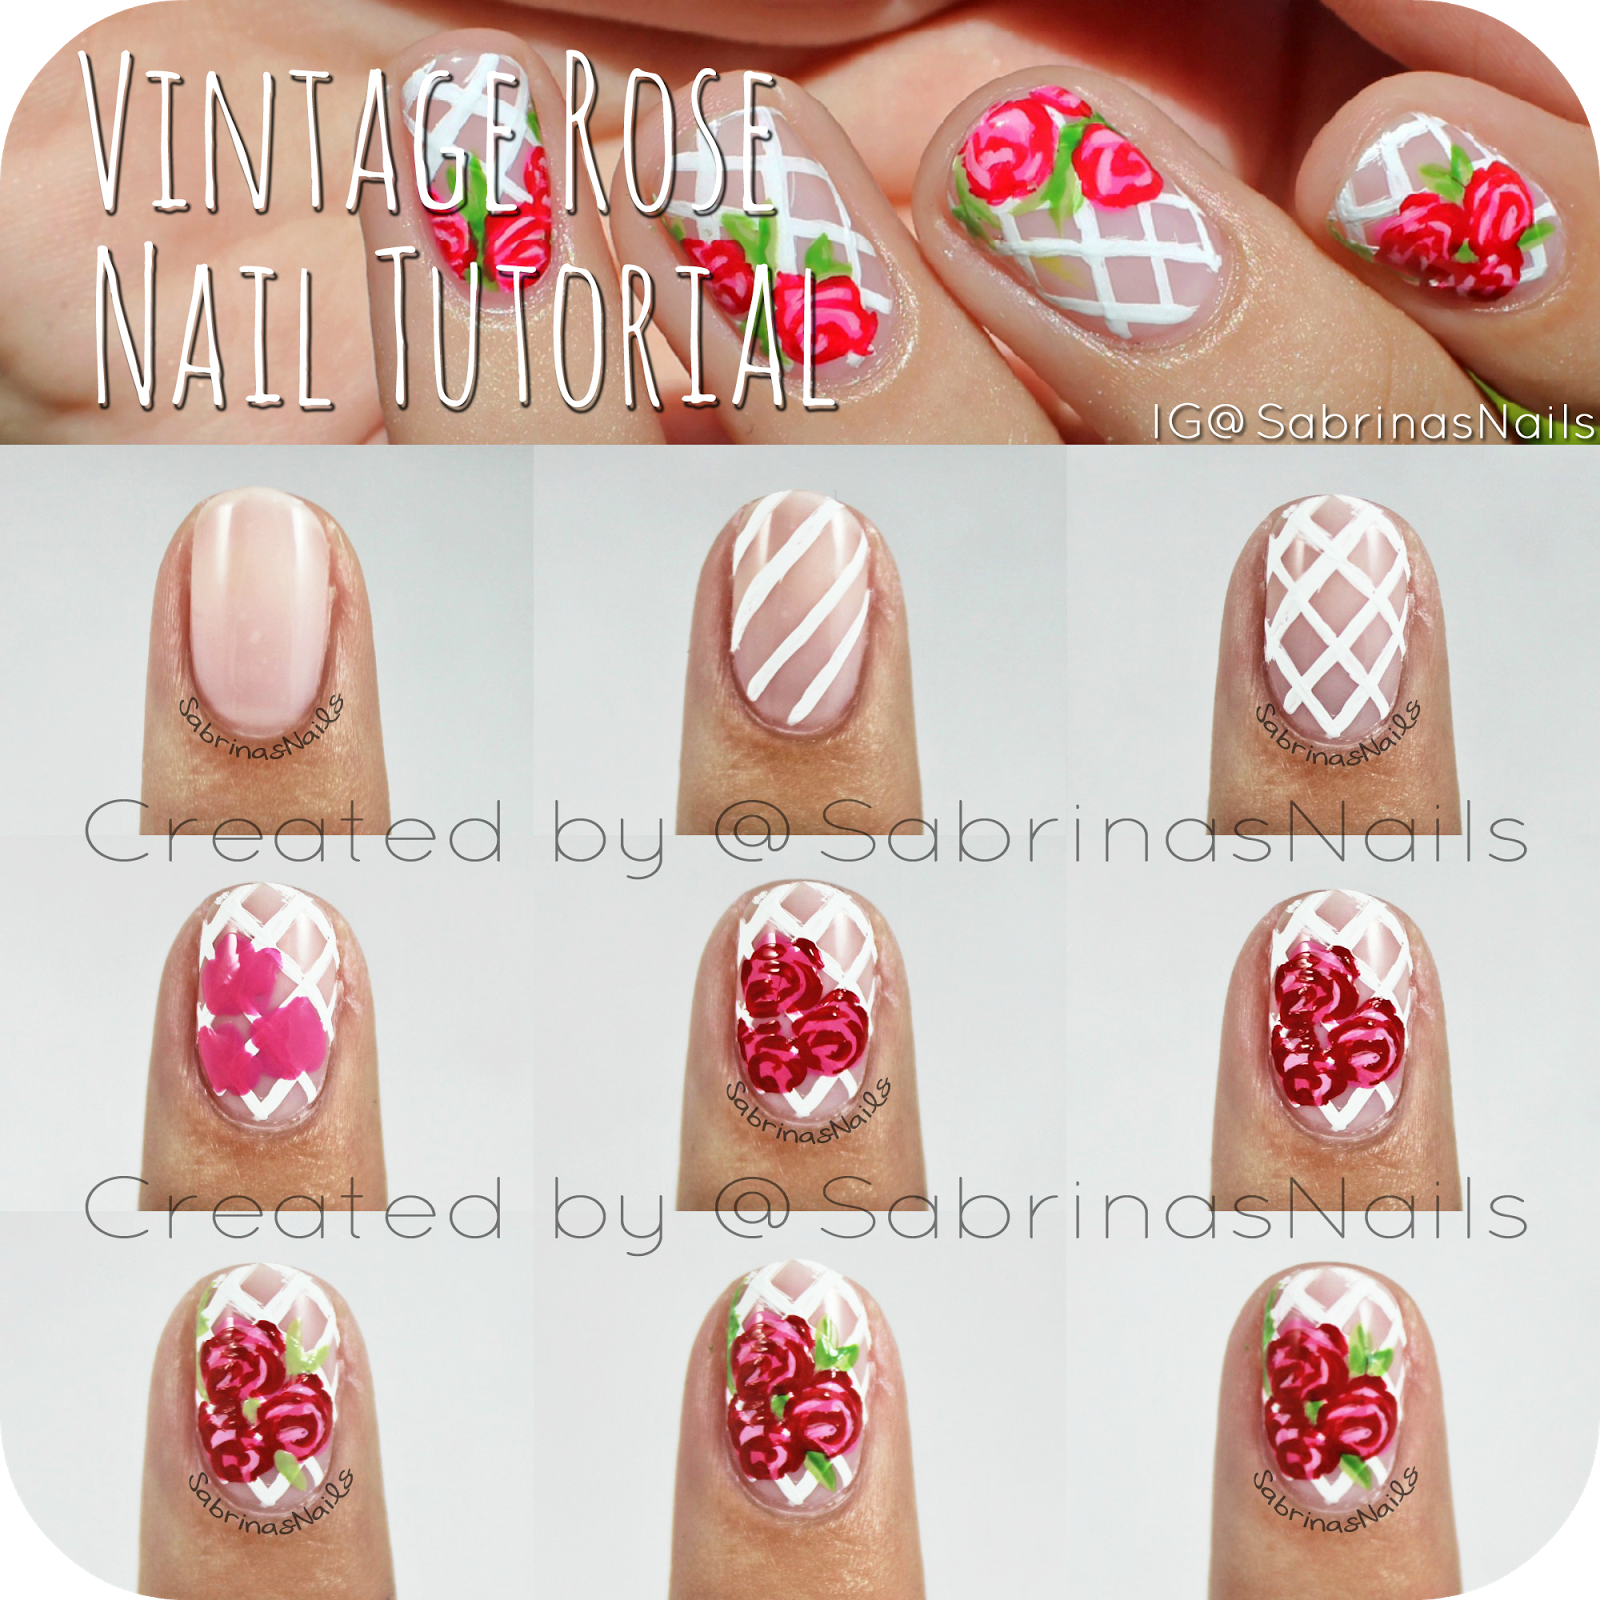
Vintage Rose Nail Tutorial
So I'm kind of obsessed with making these pictorials. Haha I'll make one with every chance that I get! I think they're so fun to put together and I love helping you all achieve my nail designs. Today I have a brand new pictorial for the Vintage Rose Nails that I did a few days ago inspired by @PrettyLittleNails. I hope you all enjoy this and continue reading for in depth instructions on how to get this nail look!

Sunday, March 30, 2014
Vintage Rose Nails
Hi everyone! What are you all up to? I'm just about to finish the 5th season of Breaking Bad! Today's nail design is inspired by Jolene (@PrettyLittleNails on Instagram). I recently came across her adorable rose design and I knew that I had to recreate it! To be honest, I was kind of scared because I haven't done a floral mani in a while and I didn't know if this design was going to turn out correctly...but I kind of like it! I hope you all do too :)

Thursday, March 27, 2014
Spring Polish Picks!
Happy Spring! Since the first day of Spring was a few days ago, I thought it was time to share my Spring Polish Picks with you all! Spring is one of my favorite times of the year because of the nice weather and pastel polishes ♥ Keep reading to find out what my favorite nail polishes are for this season!

Saturday, February 22, 2014
Skimp or Spend? # 2
I'm back with another post on my series, Skimp or Spend? I am so happy that you guys loved the last post, I received so many positive responses both on Instagram and on my blog. Thank you so much, you have all motivated me to keep this series going ❤ Today I'll be speaking about one of my favorite colors for spring, mint green!

I recently purchased Fashion Playground by Essie and as soon as I got home I wondered if I had any similar minty colors. Revlon's Jaded is pretty darn close. They look different in their bottles, but on the nail they actually look very similar. I purchased both polishes at Target, the Essie for $8.49, and the Revlon for $4.59.
Sunday, February 16, 2014
Precision Nail Lacquer - Oasis Collection
Hey everyone, today I have some nail swatches for you. Precision Nail Lacquer was so kind and sent me their new Oasis Collection to share with you all! This collection includes nudes, browns, and even a shimmer shade! If you're interested, please keep reading :)

Monday, February 10, 2014
Mix & Match Valentines Day Nails!
I am super excited about today's post! These nails are one of my all time favorites that I've ever done! :) Since Valentines Day is in just three more days, I knew that I had to create something for this occasion. I'm usually not one to do holiday themed nails but since V-day is all about hearts, the color pink and just cute things in general, I couldn't help myself ♥

Wednesday, January 29, 2014
Polishes I Received this Christmas!
Hey guys! I know Christmas was over a month ago but I never had the chance to show you all what polishes I received this past holiday. I'm so grateful for the friends and family that fed my polish addiction and I'm so excited to share my new pretties with you!
*Disclaimer* I am in no way trying to brag about things that were given to me. I simply want to share them with you and show you my collection as it grows. I love reading about what polishes people bought/ received so I thought this would be a good idea :) I also want to mention that this will be a picture heavy post!
To start, I'll show you polishes from one of my favorite brands, Essie! These polishes were given to me by my aunt, my friend Madi, and my mom!
 |
| From L to R: Off the Shoulder, Shake Your $$ Maker, Sable Collar & Using My Maiden Name |
Tuesday, November 19, 2013
Roses & Glitter Accents
I've recently been inspired by a few pink Essie colors in my collection. After staring at my polishes thinking of what design I could do, I was always drawn back to Muchi, Muchi, Boom Boom Room, and Mod Square, all by Essie! I finally decided on roses, and glitter gradients for my ring fingers.


I first painted my nails with four thin coats of Essie's Muchi, Muchi. This polish is sheer and sometimes hard to work with, but when you start to build a few layers of it, you get a smooth, light pink color! Once that dried, I took a large dotting tool and dipped it into Essie's Boom Boom Room. I placed three large dots toward the cuticle and let them dry. Next, I took Essie's Mod Square and a smaller dotting tool, to create the curved petals on the roses. With a dark green polish and the smallest dotting tool that I own, I made little tear drop shapes in arbitrary areas around the roses to act as leaves! The nail looked empty with just roses on it so at the last minute I took my white striper by Stripe Rite and created vertical lines on my nail. If stripes were to originally be in my design, I would've done them first to avoid accidentally overlapping the roses!
I was really interested to play around with Jetset In My Sunset by Curtsy and Bow. After swatching it on a piece of paper to see how much glitter I could get in one stroke, I realized that the formula on this polish wasn't so great. With one swipe, I got about two pieces of glitter, which is a shame because the gold hex glitters are gorgeous! After experimenting with this polish, I realized that I could create a glitter placement gradient (that's a mouthful) on my ring finger!
I began by dumping some of the polish out on a piece of paper (aka an old magazine I found lying around). With a toothpick, I grabbed each glitter individually and placed them heavily toward the cuticle of my nail. The further down I went, the less glitter I would add, until it looked like a gradient! The clear base in this polish helped the glitter stick to my nail. If you're using completely loose glitter, add a topcoat on your nail (to help the glitter adhere to your nail) and also dip your toothpick in topcoat to make the process of picking up glitter much easier!
I hope you liked this design as much as I did and I hope you try it out for yourself! If you do, use the hashtag #InspiredBySabrinasNails or send me a picture through Kik or Email! Thank you and have a lovely week (:
Sunday, October 20, 2013
Floral + Stripes
Today's blog post is dedicated to a cute floral and striped mani! I found inspiration from a photo I saw on Pinterest and I decided to recreate the roses and ended up with a fun and detailed design!


I started off this mani with Royally Yours by L'oreal on all of my nails except for the ring finger, a light and dusty blue color that was opaque in three coats. On my thumb and pinkie finger I added vertical stripes with a white striper. On the pointer and middle finger I carefully painted white (acrylic paint) and pink (Boom Boom Room by Essie) roses with a thin nail art brush and topped it off with curly green (acrylic paint) stems! Lastly, on my ring finger I started off with a base of gold polish (Golden-I by Sally Hansen) and added two coats of a chunky gold glitter polish (The Golden Age by Sephora by OPI [RIP]). To complete the look, I added one coat of my trusty Seche Vite topcoat! If you like this mani, feel free to tell me in the comments of this post or on Instagram! If you want to try it out for yourself, use the hashtag #InspiredBySabrinasNails or Kik me the photo of your results! See you next time!

Thursday, August 1, 2013
Freak Show Polish: Strongman II
To be honest, I was hesitant when trying this polish on. I didn't know how much different it would be to Strongman I. I'm happy to say that I was pleasantly surprised!


I started off with 4 coats of I Will! by L'oreal. It's one of the best white polishes I've tried so far! It's not thick or troublesome, it's thin but opaque. I could've gone with three coats but I'm a bit crazy and had to add an extra layer.
When the white polish dried, I topped it off with two coats of Strongman II by Freak Show Polish. I was absolutely blown away with how this looked! It was very similar to Strongman I but unique in it's own special way.
As you can see, it is gorgeous and looks different in different lighting. I love the large circle glitters and the smaller hexes, it is absolutely perfect and my favorite from all of the polishes that Carissa sent me.
Up close, you can tell that this polish is a glitter bomb. You will be getting tons of compliments if you wear this! Here's my rating of this polish:
Application: This polish isn't lumpy or thick, went on with ease.
True to Color: Yes, the glitter is just as vibrant as in the bottle.
Dry Time: 1-2 minutes.
Consistency: Normal.
Coats Until Opaque: With two coats, the glitter was mostly everywhere on the nail. I did place a few on myself just because I really love my nails to sparkle.
Additional Comments: This is up there with one of my favorite polishes I own! I will be wearing this all the time, I love how the bright glitter contrasts against the white base. You will not regret purchasing this!
Final Rating: 10/10
To purchase, visit FreakShowPolish.com or visit Carissa's Instagram (Instagram.com/FreakShowPolish) to view more swatches and polishes!
Freak Show Polish: Trapeze Swinger
Carissa describes this polish as a "...milky white jelly full of periwinkle hexes in various sizes and small green hexes." I couldn't have explained it better myself! It looks gorgeous in the bottle.


+BLOG.jpg)


I began this mani with three coats of Bikini So Teeny by Essie, probably a favorite polish by most nail freaks like me! Unfortunately for me, I think I have a bad bottle of this stuff because ever since I first purchased it, it's been thick and hard to work with. I do try to make it look decent and hopefully I've succeeded!
One coat of Seche Vite really smoothed out the thickness of this polish and made it look sleek and effortless. This was the perfect base for Trapeze Swinger!
My nails feel very bright and fun with this polish on! These look great in the sunlight, every piece of glitter picks up the suns rays and reflects them to make your nails feel like a disco ball!
Up close you can really see all of the different glitters that are in this nail polish. Here's my rating of this polish:
Application: This polish was a breeze to apply.
True to Color: I definitely thought this was a light blue jelly polish from looking at the bottle. Turns out that it's actually a white jelly, but that just means that you can layer it over more colors and it definitely goes well over Essie's Bikini So Teeny!
Dry Time: 1-2 minutes.
Consistency: Normal, no issues with it.
Coats Until Opaque: It was definitely filled with glitter with 1 coat but I really wanted it to sparkle, so I added one more.
Additional Comments: If you love blue, you'll like this nail polish and it's gorgeous sparkle.
Final Rating: 8/10
To purchase, visit FreakShowPolish.com or visit Carissa's Instagram (Instagram.com/FreakShowPolish) to view more swatches and polishes!
Tuesday, July 23, 2013
Freak Show Polish: Strongman I
Strongman I is a glitter topper with round blue and green glitters to make any mani pop. In the bottle this polish is to die for, the glitters were just calling my name!
.JPG)


.JPG)
+copy.jpg)
.JPG)
.JPG)

I first started with three coats of Mint Apple by Sinful Colors which was also my Mint Mani for Talia Joy. I really wanted to be a part of that tag so I planned this swatch to go up on Friday. Mint Apple is a gorgeous shimmery mint polish.
I absolutely love this color and think it's perfect for summer. I topped this off with two coats of Strongman I and let me tell you, I was in circle glitter heaven!
This polish is a glitter bomb! Two coats did fill most spaces and I didn't have to fish for glitter too much, but being the perfectionist that I am, I did fill in a few empty spaces on my own. Other than that this polish is gorgeous! Since the base is clear, you can layer it over any base color that you wish!
Don't these glitters make you swoon? Here's my rating for this polish:
Application: This glitter topper went on pretty easily.
True to Color: The base is clear but the glitters are as vibrant as they are in the bottle.
Dry Time: 2-3 minutes.
Consistency: The clear base did get a bit thick at times but it wasn't too hard to work with.
Coats Until Opaque: It's a clear base but it does take 2 coats for the glitters to fill most spots on the nail.
Additional Comments: I think this polish is beautiful! I did have a hard time taking it off but that's not necessarily a bad thing! That just means it's definitely long lasting. I also did have to place a few glitters on myself but that's only because I'm picky and I need glitter to be EVERYWHERE!
Final Rating: 7/10
To purchase, visit FreakShowPolish.com or visit Carissa's Instagram (Instagram.com/FreakShowPolish) to view more swatches and polishes!
Thursday, July 4, 2013
Blue Jelly Sandwich
This 4th of July I decided not to go crazy with the red, white and blue. Instead, I went for a subtle jelly sandwich that still included the classic, rich blue color in the flag.

For being my first attempt at a jelly sandwich, I am actually pretty proud. I never thought it would be packed with so much glittery deliciousness. I can't stop staring at my sparkly blue finger nails!


For being my first attempt at a jelly sandwich, I am actually pretty proud. I never thought it would be packed with so much glittery deliciousness. I can't stop staring at my sparkly blue finger nails!
A jelly sandwich is when you sandwich a glitter polish between a jelly polish. For example, in my mani I started off with a few coats of Bouncer, It's Me by Essie, then I added two coats of Radiant by Revlon for the glitter, and finished it off with one last coat of Bouncer, It's Me.
The consistency of a jelly polish is very thin and sheer, which is why it works so well for a jelly sandwich. When I add the final coat of Bouncer, It's Me, it's thin enough to still make the glitter visible but thick enough to tint the glitter to a dark blue.
Radiant by Revlon is packed with medium sized, green, silver, and turquoise hex glitters. Along with very small and circular turquoise glitters. Two coats was just right for this look. I am so in love with this mani and I'll be keeping this one on for a while!
Tuesday, May 21, 2013
Chalkboard Nails
This weekend I decided to try something new and out of my comfort zone, Chalkboard Nails!


I think that all of ours came out so nicely and I am extremely happy that I had this opportunity! They are such nice girls and I can't believe I was lucky enough to do this, I have loved their nail art for the longest time! I encourage you to try chalkboard nails, they are super easy to personalize and are super fun and cute. If you try them, post them on Instagram, tag me and use the hashtag #inspiredbysabrinasnails. Or you can send me the picture through Kik or Email! Happy polishing!
For this design, I decided to go crazy and draw random doodles that I would draw if I had a chalkboard. I finally had a chance to use all of my colorful nail art stripers for this! I think these are so fun and very simple to do. I started of with a black nail polish, created wacky designs with my nail art stripers, and finished it off with a matte top coat.
I had seen chalkboard manis a lot on Instagram recently, but what really motivated me to try it was the fact that @NailMachine and @PamelaPomelo wanted to do triplet nails with this theme!
 |
| A collage of all of our nails! |
Subscribe to:
Posts (Atom)