

Showing posts with label Essie. Show all posts
Showing posts with label Essie. Show all posts
Monday, May 26, 2014
Subtle Polka Dots
Hey everyone! Sorry again for my absence, (I feel like I say this so often now!) this last month of school has been really stressful and I haven't had time to paint my nails. I seriously can't wait for summer, it feels like I haven't had time to relax in years. Anyways, yesterday I finally had time to paint my nails again. Keep reading to find out more!

Saturday, May 3, 2014
Girly Nautical Nails!
What's up beautiful people? Today I have some super cool nails inspired by the wonderful Karissa from @LifeIsBetterPolished on Instagram! I recently saw her do some really pretty nautical themed nails and I knew I had to recreate them. I haven't done anything like this before and I really love it!

Tuesday, April 15, 2014
Pastel Galaxy Nail Tutorial
What's up guys! It seriously feels like I haven't been on Instagram or my blog for a million years! I've recently been busy with school, homework, and this past weekend I spent in Disneyland so I've really had no time to do my nails or post anything :( But I'm back now and I finally have the Pastel Galaxy Pictorial that you guys have been highly requesting! Keep reading for the step by step instructions ♥
![]()

Sunday, April 6, 2014
Pastel Galaxy Nails
It's the second to last day of my Spring Break and I feel like I want to cry! I've gotten so used to relaxing all day, I don't want to go back to having responsibilities. Haha but the good news is that I have new nails for you! Today I have some pastel galaxy nails that I love! I've tried traditional galaxy nails twice before but I wanted to add a twist to these. These pastel colors make this design perfect for Spring!

Wednesday, April 2, 2014
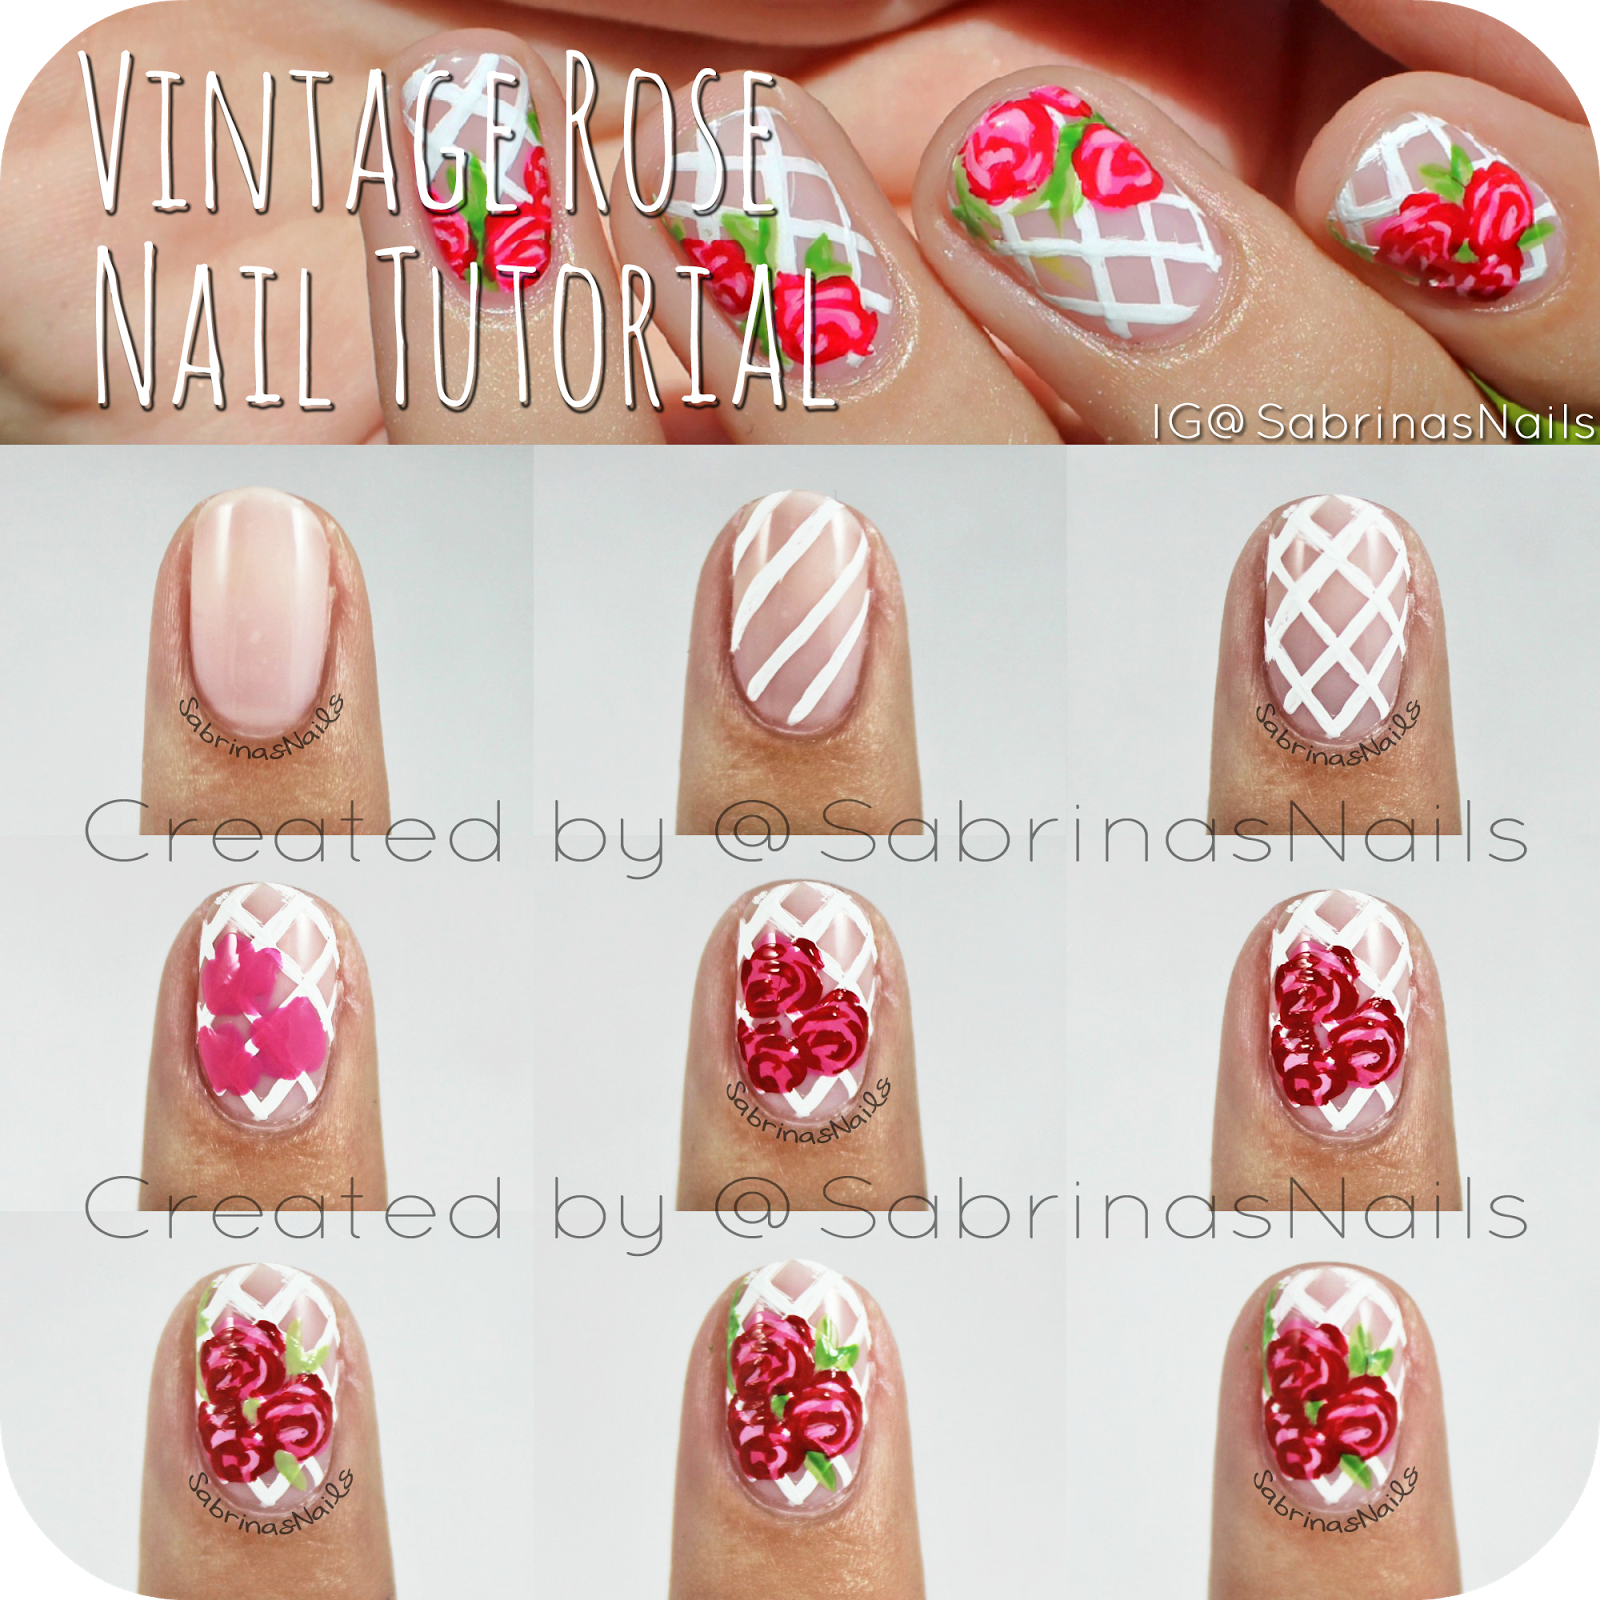
Vintage Rose Nail Tutorial
So I'm kind of obsessed with making these pictorials. Haha I'll make one with every chance that I get! I think they're so fun to put together and I love helping you all achieve my nail designs. Today I have a brand new pictorial for the Vintage Rose Nails that I did a few days ago inspired by @PrettyLittleNails. I hope you all enjoy this and continue reading for in depth instructions on how to get this nail look!
Sunday, March 30, 2014
Vintage Rose Nails
Hi everyone! What are you all up to? I'm just about to finish the 5th season of Breaking Bad! Today's nail design is inspired by Jolene (@PrettyLittleNails on Instagram). I recently came across her adorable rose design and I knew that I had to recreate it! To be honest, I was kind of scared because I haven't done a floral mani in a while and I didn't know if this design was going to turn out correctly...but I kind of like it! I hope you all do too :)

Thursday, March 27, 2014
Spring Polish Picks!
Happy Spring! Since the first day of Spring was a few days ago, I thought it was time to share my Spring Polish Picks with you all! Spring is one of my favorite times of the year because of the nice weather and pastel polishes ♥ Keep reading to find out what my favorite nail polishes are for this season!

Friday, March 21, 2014
Skimp or Spend? # 3
Good afternoon everyone! How are you all doing? I'm home sick today (I just woke up with a really sore throat, nothing major) and I decided I'd post another Skimp or Spend? post for you! Thank you so much for loving this series, your positive feedback makes me so happy! :)

Saturday, February 22, 2014
Skimp or Spend? # 2
I'm back with another post on my series, Skimp or Spend? I am so happy that you guys loved the last post, I received so many positive responses both on Instagram and on my blog. Thank you so much, you have all motivated me to keep this series going ❤ Today I'll be speaking about one of my favorite colors for spring, mint green!

I recently purchased Fashion Playground by Essie and as soon as I got home I wondered if I had any similar minty colors. Revlon's Jaded is pretty darn close. They look different in their bottles, but on the nail they actually look very similar. I purchased both polishes at Target, the Essie for $8.49, and the Revlon for $4.59.
Wednesday, January 29, 2014
Polishes I Received this Christmas!
Hey guys! I know Christmas was over a month ago but I never had the chance to show you all what polishes I received this past holiday. I'm so grateful for the friends and family that fed my polish addiction and I'm so excited to share my new pretties with you!
*Disclaimer* I am in no way trying to brag about things that were given to me. I simply want to share them with you and show you my collection as it grows. I love reading about what polishes people bought/ received so I thought this would be a good idea :) I also want to mention that this will be a picture heavy post!
To start, I'll show you polishes from one of my favorite brands, Essie! These polishes were given to me by my aunt, my friend Madi, and my mom!
 |
| From L to R: Off the Shoulder, Shake Your $$ Maker, Sable Collar & Using My Maiden Name |
Tuesday, January 28, 2014
Stars and Half Moons
Onto my nails, the other day I was browsing through Candice's lovely Instagram (@MrCandiiPants) and was completely inspired by her twist on half moons + a french tip! So inspired that I revolved my whole mani around them, adding stars for an extra touch of chic.

Monday, January 6, 2014
#NailArtJan - Sparkles
Phew, today was easier to figure out than Day 3 - Fresh! I have so many glitter polishes but I immediately knew which one I wanted to use. I recently bought Essie's Lots of Lux, it's been staring at me for a while and I realized that this was a perfect time to use it!


Lots of Lux is a cobalt blue, textured polish. In the bottle you can really see the blue, green, and deep purple shimmer throughout the polish. When applied, it dries to a matte texture that's somewhat gritty but really beautiful because of all of the sparkle. Did I also mention that it's 99% opaque in one coat?! Seriously, so many people have had the same reactions and I didn't believe it until I tried it. Of course, I had to add another coat because I just don't feel okay without it, but it's fine with just one!
Out in the sunlight, you can easily see the texture in Lots of Lux. If you prefer smooth nails, you could add a topcoat to this but I really love the fine grit to this. Overall I'm so happy that I purchased this nail polish! I haven't heard that many good things about Essie's Encrusted Treasures Collection but Lots of Lux sure seems to be a hit! I also purchase Ignite the Night and I'm praying that it's as fabulous as this! Not too sure if I'll be purchasing Belugaria or Peak of Chic any time soon but so far I love what Essie has done with Lots of Lux. I'm so excited to wear this for the next few days, I'm afraid I won't be able to focus on school with nails like these :) So tell me, what do you think of the Encrusted Treasures Collection? Do you own any polishes from it or do you plan to? I'm personally on the fence about buying any more but Hors D'ouevres and On A Silver Platter just look so nice! Leave me a comment about what you think down below!
Sunday, January 5, 2014
#NailArtJan - Fresh
It was honestly really difficult to think of a nail design that is seen as "fresh." I first think of fresh air, freshly cut grass and fresh fruit, but I didn't really want any of those things on my nails. So I decided on fresh flowers. I had seen a design a few weeks ago by @OrlyNailGirls and completely fell in love. The design included a sheer background and crisp, white flowers on top of it.


To start, I grabbed the nail polishes that I needed. For the nudey-pink base, I used Essie's Mademoiselle. I also needed a white polish for the flower petals so I used Sinful Color's Snow Me White. Lastly, for the center of the flower I used Mellow Yellow by Sally Hansen Xtreme Wear.
After painting my nails with two coats of Essie's Mademoiselle, I used a large dotting tool dipped in white polish to create a big flower at the top of my nail. As the flowers go down my nail and decrease in size, so do my dotting tools. I used a large, medium and small sized dotting tool for the flowers and a toothpick for the smallest daisy.
Once the flowers were dry, I took Mellow Yellow and created small dots in the center of each flower. I then added a matte top coat and I'm done! I love this design and I think it looks very fresh and it's such a palette cleanser compared to all of the sparkly and intricate New Years nails. I hope you guys love these as much as I do and I hope you all had a fun and safe New Year!
Sunday, December 8, 2013
NOTD: Essie's Lilacism
For the past week I've been wearing the oh-so fabulous Lilacism by Essie! I recently bought this polish at Target on Black Friday thinking that it would be on sale, but everything seemed to be at regular price. Being me, I purchased it anyway because I convinced myself that all of my other light purple polishes looked nothing like this one.


Lilacism is from Essie's 2010 Art of Spring Collection but is now on Essie's Core Collection, meaning that you can find it at any time wherever Essie is sold. This polish is a dusty lilac color with blue undertones and is opaque in 2-3 coats. The first coat is streaky but once you add another, it's perfect. I used Seche Vite as my topcoat and this polish started chipping at day 6 which I personally think is great because I always like to switch my nail color up anyway.

In outdoor lighting, you can really see the blue undertones. And indoors it can change lilac to looking like a light grey. This cream polish is definitely unique and perfect for Winter & Spring! What are your thoughts on this polish? Tell me in the comments below or on Instagram! Farewell!

Wednesday, December 4, 2013
Silver Glitter Gradient + New Nail Shape!
Hello everyone! Today I have a really simple design and a brand new nail shape. I decided to switch to almond shape nails after ogling Christine's gorgeous nails for a few months now. Not sure how long I'll have this shape for but I'll enjoy it while it lasts!
On my nails I have a silver glitter gradient over a sheer pink. This look is extremely elegant and perfect for a wedding, holiday parties or any time you want some glam nails!


On my nails I have a silver glitter gradient over a sheer pink. This look is extremely elegant and perfect for a wedding, holiday parties or any time you want some glam nails!
I started this look with three thin coats of Mademoiselle by Essie. Mademoiselle is a new polish of mine and I really love it. It's sheer enough so you can slightly see your nail, but it's opaque enough to cover any stains I have on my nail. After the sheer polish was dry, I took Tiara by Orly and a makeup wedge and sponged the fine silver glitter onto 3/4 of my nail.
To add even more glitter, I sponged on Set In Stones by Essie to the tips of my nails. Finally, I added one coat of Seche Vite to seal all of that glitter in! I am honestly in love with these nails and I want to keep them on forever! I hope you like them too :)
Saturday, November 23, 2013
Black & White Polka Dots With a Twist!
Hey! Today I was in sort of a rush so I wanted a nail design that was simple but still really cute. I decided on pink nails with black and white polka dot accent nails! This design was really easy to do and I hope you like it!
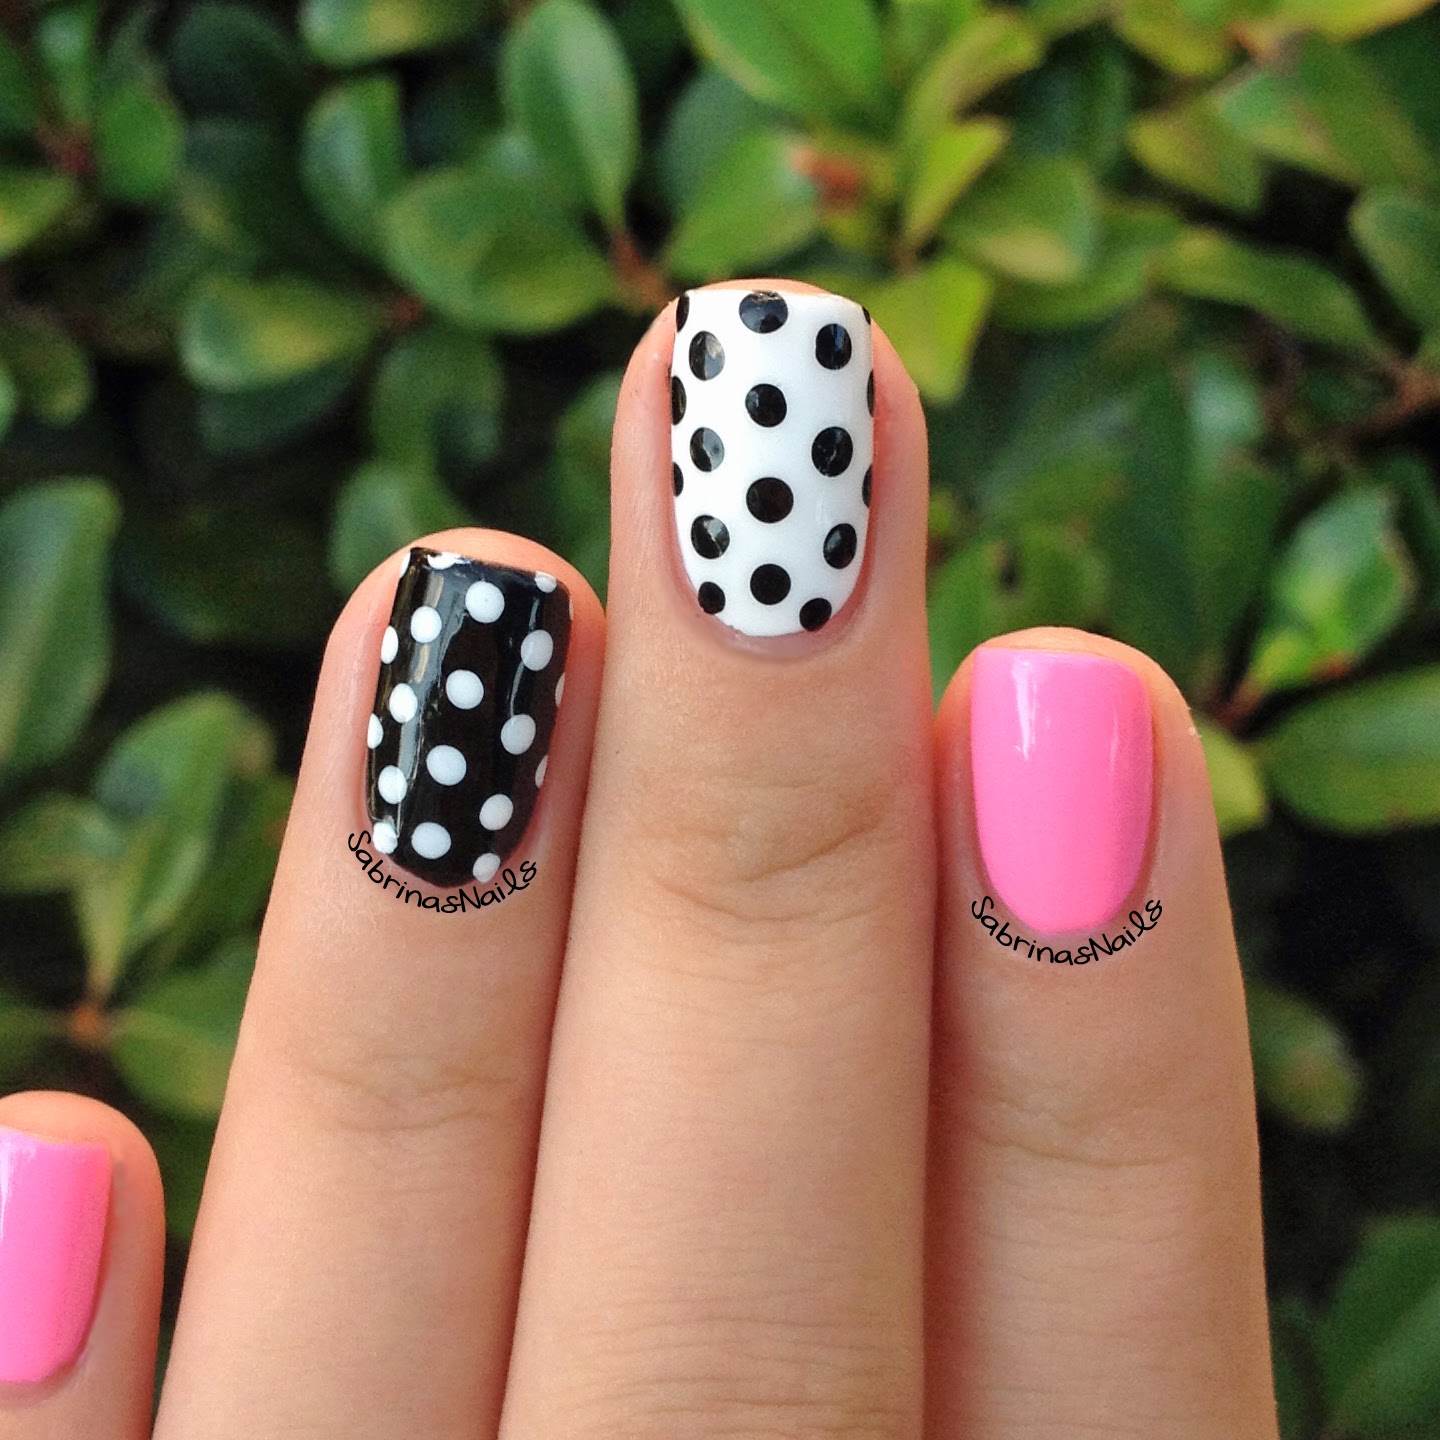
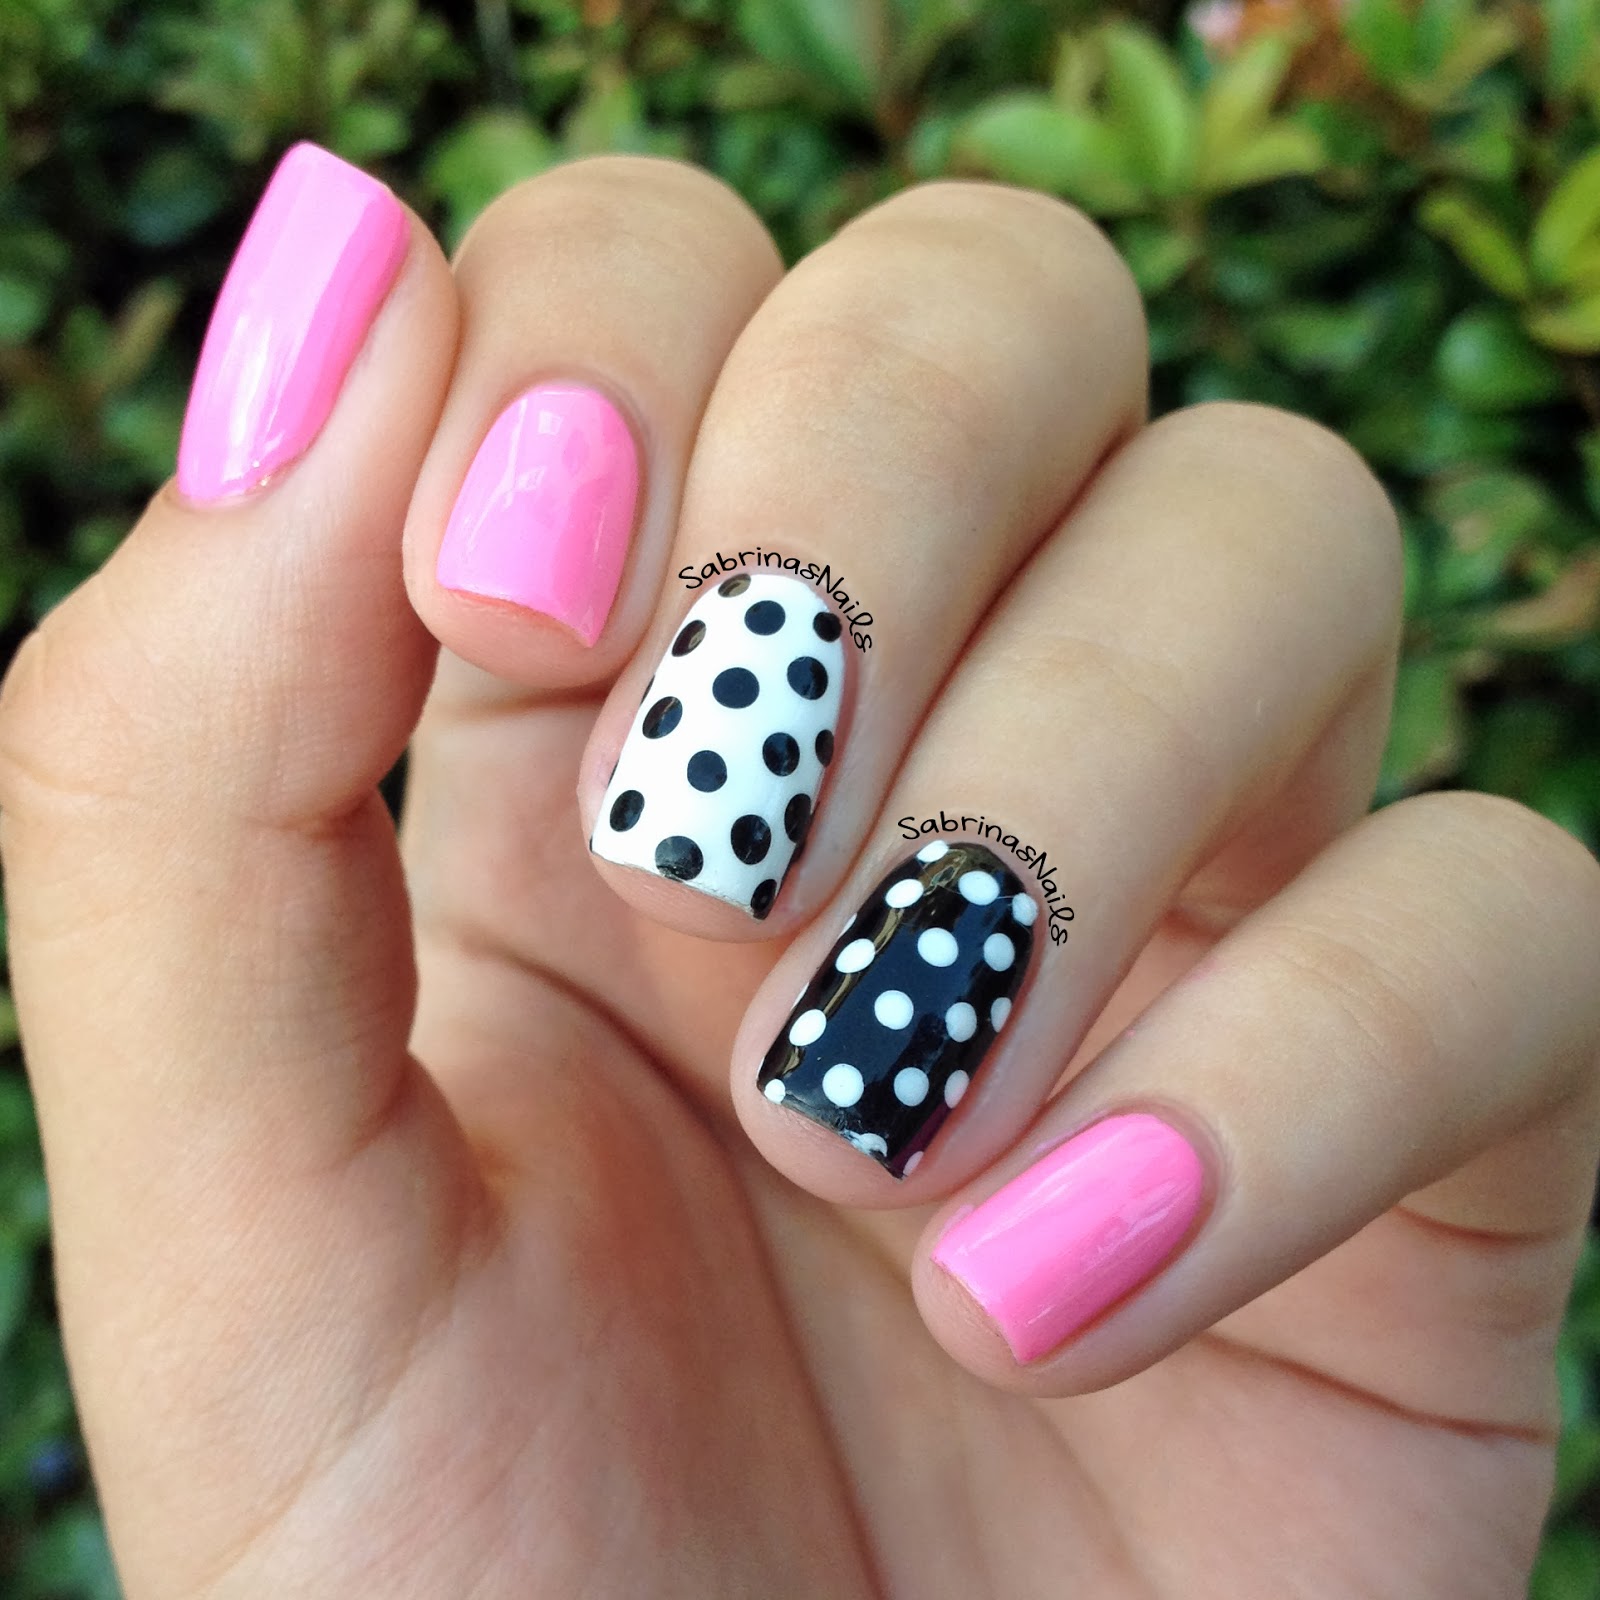


I began by painting my thumb, pinkie, and index finger with Essie's Boom Boom Room. I've talked about BBR so much since I've gotten it because it's my go-to pink polish. As always, the formula on this nail polish is perfection, opaque in two coats and it just glides on! This cream polish is amazing and I kind of feel bad for my other pink polishes because I use this one so much!
Next, I painted my middle finger with Superstar! by Pure Ice. It's not my favorite white polish but all of my other ones are streaky or thick. I then painted my ring finger with Liquid Leather by China Glaze. I feel like I've had this polish for years and it's still just as great as when I first bought it! It's opaque in two coats and it's also wonderful to use for nail art.
Finally, I used black to add polka dots to my middle finger and white to add polka dots to my ring finger. One coat of Seche Vite and it's done! These nails make me very happy despite the fact that my index finger nail is a bit broken :( I hope you like these and have a great day!
Tuesday, November 19, 2013
Roses & Glitter Accents
I've recently been inspired by a few pink Essie colors in my collection. After staring at my polishes thinking of what design I could do, I was always drawn back to Muchi, Muchi, Boom Boom Room, and Mod Square, all by Essie! I finally decided on roses, and glitter gradients for my ring fingers.


I first painted my nails with four thin coats of Essie's Muchi, Muchi. This polish is sheer and sometimes hard to work with, but when you start to build a few layers of it, you get a smooth, light pink color! Once that dried, I took a large dotting tool and dipped it into Essie's Boom Boom Room. I placed three large dots toward the cuticle and let them dry. Next, I took Essie's Mod Square and a smaller dotting tool, to create the curved petals on the roses. With a dark green polish and the smallest dotting tool that I own, I made little tear drop shapes in arbitrary areas around the roses to act as leaves! The nail looked empty with just roses on it so at the last minute I took my white striper by Stripe Rite and created vertical lines on my nail. If stripes were to originally be in my design, I would've done them first to avoid accidentally overlapping the roses!
I was really interested to play around with Jetset In My Sunset by Curtsy and Bow. After swatching it on a piece of paper to see how much glitter I could get in one stroke, I realized that the formula on this polish wasn't so great. With one swipe, I got about two pieces of glitter, which is a shame because the gold hex glitters are gorgeous! After experimenting with this polish, I realized that I could create a glitter placement gradient (that's a mouthful) on my ring finger!
I began by dumping some of the polish out on a piece of paper (aka an old magazine I found lying around). With a toothpick, I grabbed each glitter individually and placed them heavily toward the cuticle of my nail. The further down I went, the less glitter I would add, until it looked like a gradient! The clear base in this polish helped the glitter stick to my nail. If you're using completely loose glitter, add a topcoat on your nail (to help the glitter adhere to your nail) and also dip your toothpick in topcoat to make the process of picking up glitter much easier!
I hope you liked this design as much as I did and I hope you try it out for yourself! If you do, use the hashtag #InspiredBySabrinasNails or send me a picture through Kik or Email! Thank you and have a lovely week (:
Saturday, November 2, 2013
Gradient Triangles
My sister and I decided to have a "Nail Painting Day" to paint our nails with a similar design. We decided on a design that we've been seeing everywhere on Instagram and Pinterest. There's no specific name for them but they look like triangles that start near the cuticle.


I started this design with two coats of white polish topped with Seche Vite for faster dry time. Since I used tape for this mani, I had to wait about an hour until the white polish was completely dry or else once the tape is added, it will pull polish up with it. Once the polish was dry, I added two strips of tape starting from the cuticle and meeting up with each other to create a triangle. I then applied a dark purple polish ( Spontaneous by China Glaze), a medium purple polish (Play Date by Essie), and a light purple polish (Sweet Hook by China Glaze) onto a cosmetic wedge and started to sponge it onto the nail. After a few coats of sponging and a coat of Fairy Dust by China Glaze, I carefully peeled the tape off to reveal crisp lines on the triangle. I added one coat of Seche Vite and Voila! They're finished!

As I mentioned earlier, my sister also did her nails but she decided to do a pink gradient instead of purple. She followed the exact same steps as I did but her dark pink polish was Mod Square by Essie, her medium pink polish was Boom Boom Room by Essie, and her light pink polish was Muchi Muchi by Essie. We both loved how these turned out and kept these on for as long as we possibly could (a little over a week)! If you try these out, use the hashtag #InspiredBySabrinasNails or send the picture to me though Email or Kik! I'll see you next time!
Sunday, October 20, 2013
Floral + Stripes
Today's blog post is dedicated to a cute floral and striped mani! I found inspiration from a photo I saw on Pinterest and I decided to recreate the roses and ended up with a fun and detailed design!


I started off this mani with Royally Yours by L'oreal on all of my nails except for the ring finger, a light and dusty blue color that was opaque in three coats. On my thumb and pinkie finger I added vertical stripes with a white striper. On the pointer and middle finger I carefully painted white (acrylic paint) and pink (Boom Boom Room by Essie) roses with a thin nail art brush and topped it off with curly green (acrylic paint) stems! Lastly, on my ring finger I started off with a base of gold polish (Golden-I by Sally Hansen) and added two coats of a chunky gold glitter polish (The Golden Age by Sephora by OPI [RIP]). To complete the look, I added one coat of my trusty Seche Vite topcoat! If you like this mani, feel free to tell me in the comments of this post or on Instagram! If you want to try it out for yourself, use the hashtag #InspiredBySabrinasNails or Kik me the photo of your results! See you next time!
Monday, September 23, 2013
Matte Watermarble
After seeing @Mucking_Fusser do a watermarble design over a gradient the other day, I knew I had to try it! I'm definitely not as skilled as Corynn when it comes to watermarbling, but that doesn't mean I can't try!


I started off by creating a gradient on all of my nails. I applied Boom Boom Room by Essie (my all time favorite pink cream polish!) to the top of a makeup sponge, followed by Play Date by Essie to go underneath it. I then rolled and dabbed the sponge onto my nail to create this gradient effect!
Once the gradient dried, I used Superstar! by Pure Ice and Orly's Sec N Dry for the watermarble that I put on top of the pink & purple. Check out Corynn's blog www.MuckingFusser.com for in depth watermarle tutorials! I topped off the design with Seche Vite and cleaned up the excess polish on my fingers with cotton swabs and nail polish remover.
This design looks great when shiny but I did add one coat of OPI's Matte Top Coat to this because it made this easier to photograph because there were no glares! I really do love how this looks when matte and I love this design in general. I do have to admit that this took quite a long time, (about 3 hours for both hands + clean up) but if you tape your fingers, I'm sure the process would go by much faster!
I can't wait to try this design again with different color combinations and a more uniform watermarble! This mani will look good on almost every nail shape and length so please try it out! I hope you love this and have a fantastic day!
Subscribe to:
Posts (Atom)