

Showing posts with label Summer. Show all posts
Showing posts with label Summer. Show all posts
Sunday, March 30, 2014
Vintage Rose Nails
Hi everyone! What are you all up to? I'm just about to finish the 5th season of Breaking Bad! Today's nail design is inspired by Jolene (@PrettyLittleNails on Instagram). I recently came across her adorable rose design and I knew that I had to recreate it! To be honest, I was kind of scared because I haven't done a floral mani in a while and I didn't know if this design was going to turn out correctly...but I kind of like it! I hope you all do too :)

Monday, March 10, 2014
Watermarble Nail Tutorial
Good afternoon dolls ♥ Today I have a long overdue pictorial to share with you! I'm so sorry for not being able to post this last Thursday like I planned to, I've been incredibly busy with school and tests :( I hope this tutorial can make up for it! Keep reading for written instructions on how to watermarble.

Sunday, March 9, 2014
Cotton Candy Watermarble Nails

Hey everyone! This will be a short and sweet post but I just wanted to share my finished design with you all :) I haven't done any watermarbling in such a long time and I've really been wanting to try it again so I thought this would be the perfect time to get back into it!
Tuesday, March 4, 2014
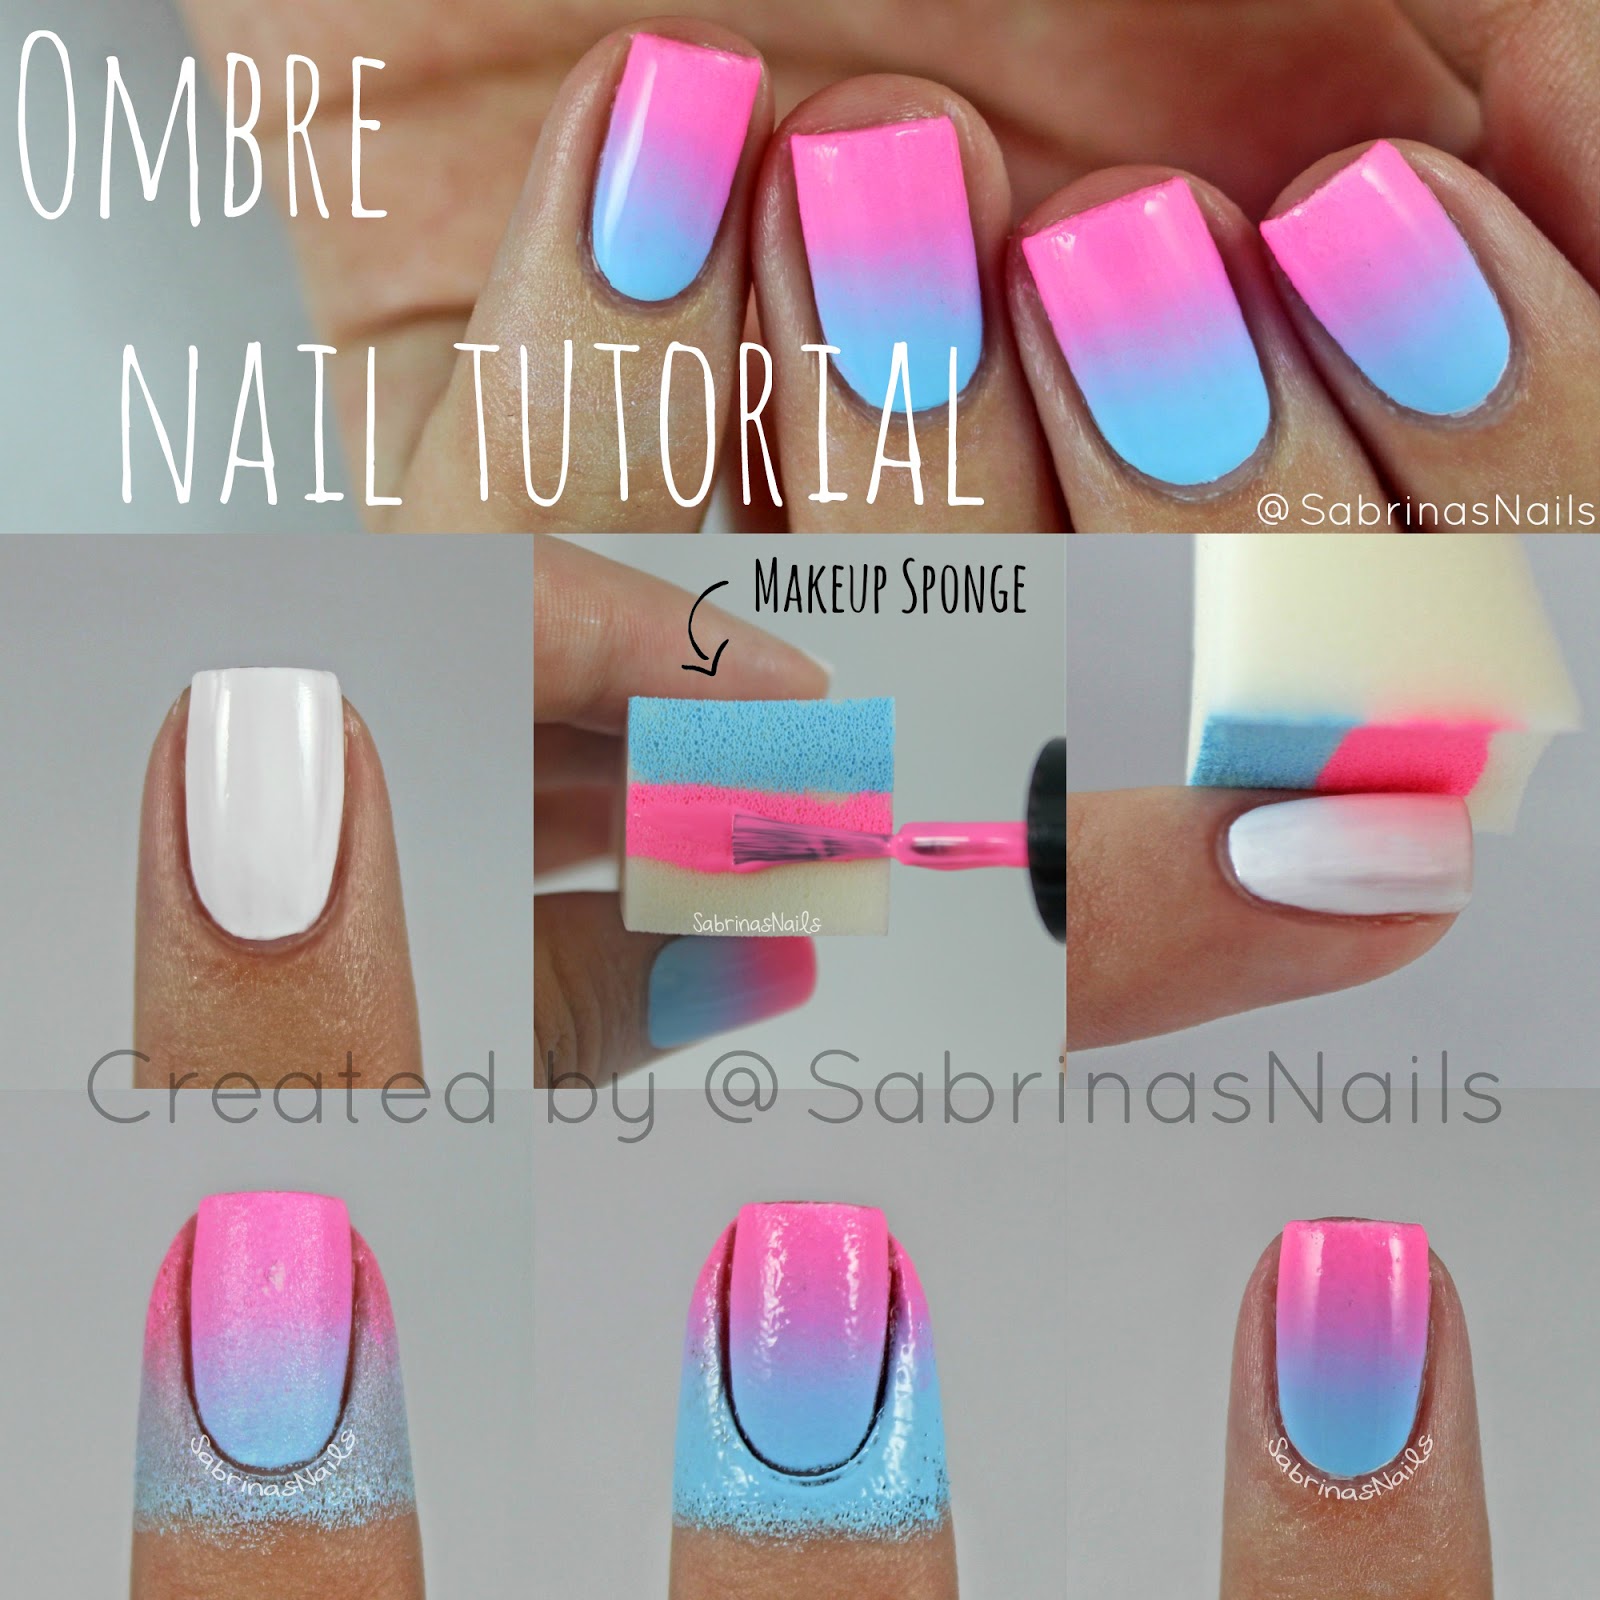
Ombre Nail Tutorial!
Happy Tuesday! Today I have an Ombre Nail Tutorial to share with you :) I'm honestly becoming obsessed with creating pictorials, they're so fun to make! Enjoy!
Monday, September 23, 2013
Sephora By OPI Haul
Recently Sephora by OPI Nail Polish have been announced to be discontinued. As sad as that is, the good news is that they are all on sale for only $4.50! (Instead of their usual price of $9.00.) My mom took advantage of this sale and went to our local Sephora to pick up a few polishes for me. I told her that all I needed was a gold glitter polish but she came back with all of these beauties!

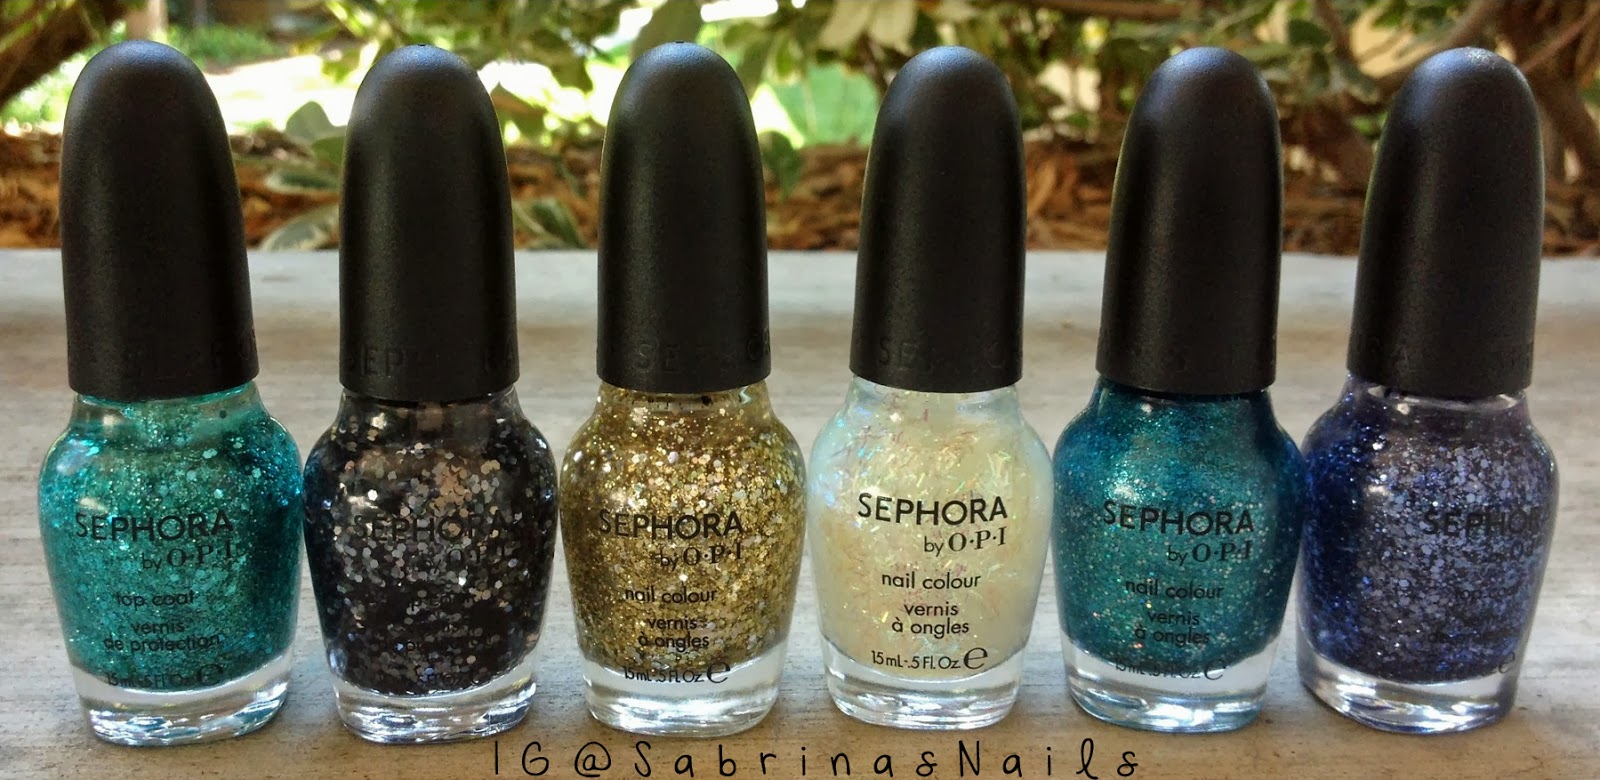 |
| (From L to R) Not Your Average Turquoise, To The Glitter End!, The Golden Age, Hollywood If I Could, I'm So Sari! and Indi-go With The Flow |
I'm in love with all of these and I can't wait to use them! I definitely recommend to check out the sale before all of the good colors run out! Have a nice day!
Matte Watermarble
After seeing @Mucking_Fusser do a watermarble design over a gradient the other day, I knew I had to try it! I'm definitely not as skilled as Corynn when it comes to watermarbling, but that doesn't mean I can't try!


I started off by creating a gradient on all of my nails. I applied Boom Boom Room by Essie (my all time favorite pink cream polish!) to the top of a makeup sponge, followed by Play Date by Essie to go underneath it. I then rolled and dabbed the sponge onto my nail to create this gradient effect!
Once the gradient dried, I used Superstar! by Pure Ice and Orly's Sec N Dry for the watermarble that I put on top of the pink & purple. Check out Corynn's blog www.MuckingFusser.com for in depth watermarle tutorials! I topped off the design with Seche Vite and cleaned up the excess polish on my fingers with cotton swabs and nail polish remover.
This design looks great when shiny but I did add one coat of OPI's Matte Top Coat to this because it made this easier to photograph because there were no glares! I really do love how this looks when matte and I love this design in general. I do have to admit that this took quite a long time, (about 3 hours for both hands + clean up) but if you tape your fingers, I'm sure the process would go by much faster!
I can't wait to try this design again with different color combinations and a more uniform watermarble! This mani will look good on almost every nail shape and length so please try it out! I hope you love this and have a fantastic day!
Thursday, August 15, 2013
Dazzling Chevrons
I finally decided to try out the famous chevron mani by @SelenaDee_Nails on Instagram! This design is not only popular, but very simple and appealing. I thought this design would be perfect for the Jonas Brothers concert I was going to that day, yes I was totally there for their comeback, and they were just as great since the last time I saw them in 2008!


I swapped out the bright red that Selena used on her thumb, index and pinkie fingers for Essie's Butler Please, a rich blue. This was the first time I used my new polish and I was honestly a bit confused. To my surprise, Butler Please is a crelly polish! It applied like a cream but was somewhat sheer and dried matte. It was opaque in two coats but with one more coat it was much brighter.
When I know I'm doing a full silver glitter nail, I always apply one coat of a metallic silver polish first. I do this so that there won't be empty spots if the glitter doesn't cover my whole nail, meaning I'll need less coats of the glitter polish. My go-to glitter is Essie's Set in Stones, it's packed with sparkle and will never disappoint! I layered three coats of that over one coat of Silver Mercedes by Pure Ice, a metallic polish.
For the accent chevron nail I started off with a few coats of Superstar! by Pure Ice, a creamy white. This isn't my favorite white polish, its a bit old and thick. I thought I had grabbed I Will! by Loreal but realized I hadn't and was too lazy to walk a few steps to my room to switch them out, haha so I thought this would do. When doing this tape mani, you have to make sure the white is completely dry before moving on, or else the tape could ruin the wet nail. I added a coat of Seche Vite to speed up the drying time.
In the mean time I was cutting up the pieces of tape for this design. I don't own any zigzag scissors so I followed @Jewsie_Nails tutorial for her easy chevrons. Using a regular piece of tape I folded it (sticky sides out) and cut an angled line down the fold, and then did it once again to get a thin v-shaped piece of tape after I opened it up.
I placed the pieces of tape on my dry nail and pressed them down to make sure no pieces were oddly lifted up. Then I painted two coats of Liquid Leather by China Glaze on my whole nail and quickly but carefully lifted the tape off of my nail. Ta-da! You're left with a beautiful chevron accent nail! I used my black and white nail art stripers to clean up any empty/uneven lines and I had a very clean and pretty chevron.
One coat of Seche Vite on each nail and the design was done! I'm pleased with how this came out and I'm definitely doing more chevron manis in the future now that I know how to do them. I hope you all like this and try this out! Have a great day!

Tuesday, August 13, 2013
Tribal City
Wow, a lot of you guys on Instagram really loved this design when I posted it yesterday! I wasn't expecting such a positive response after an entire week of nail fails which was the reason for my 6 day absence. I'm not completely sure what inspired this design but I'm pretty pleased with how it turned out!


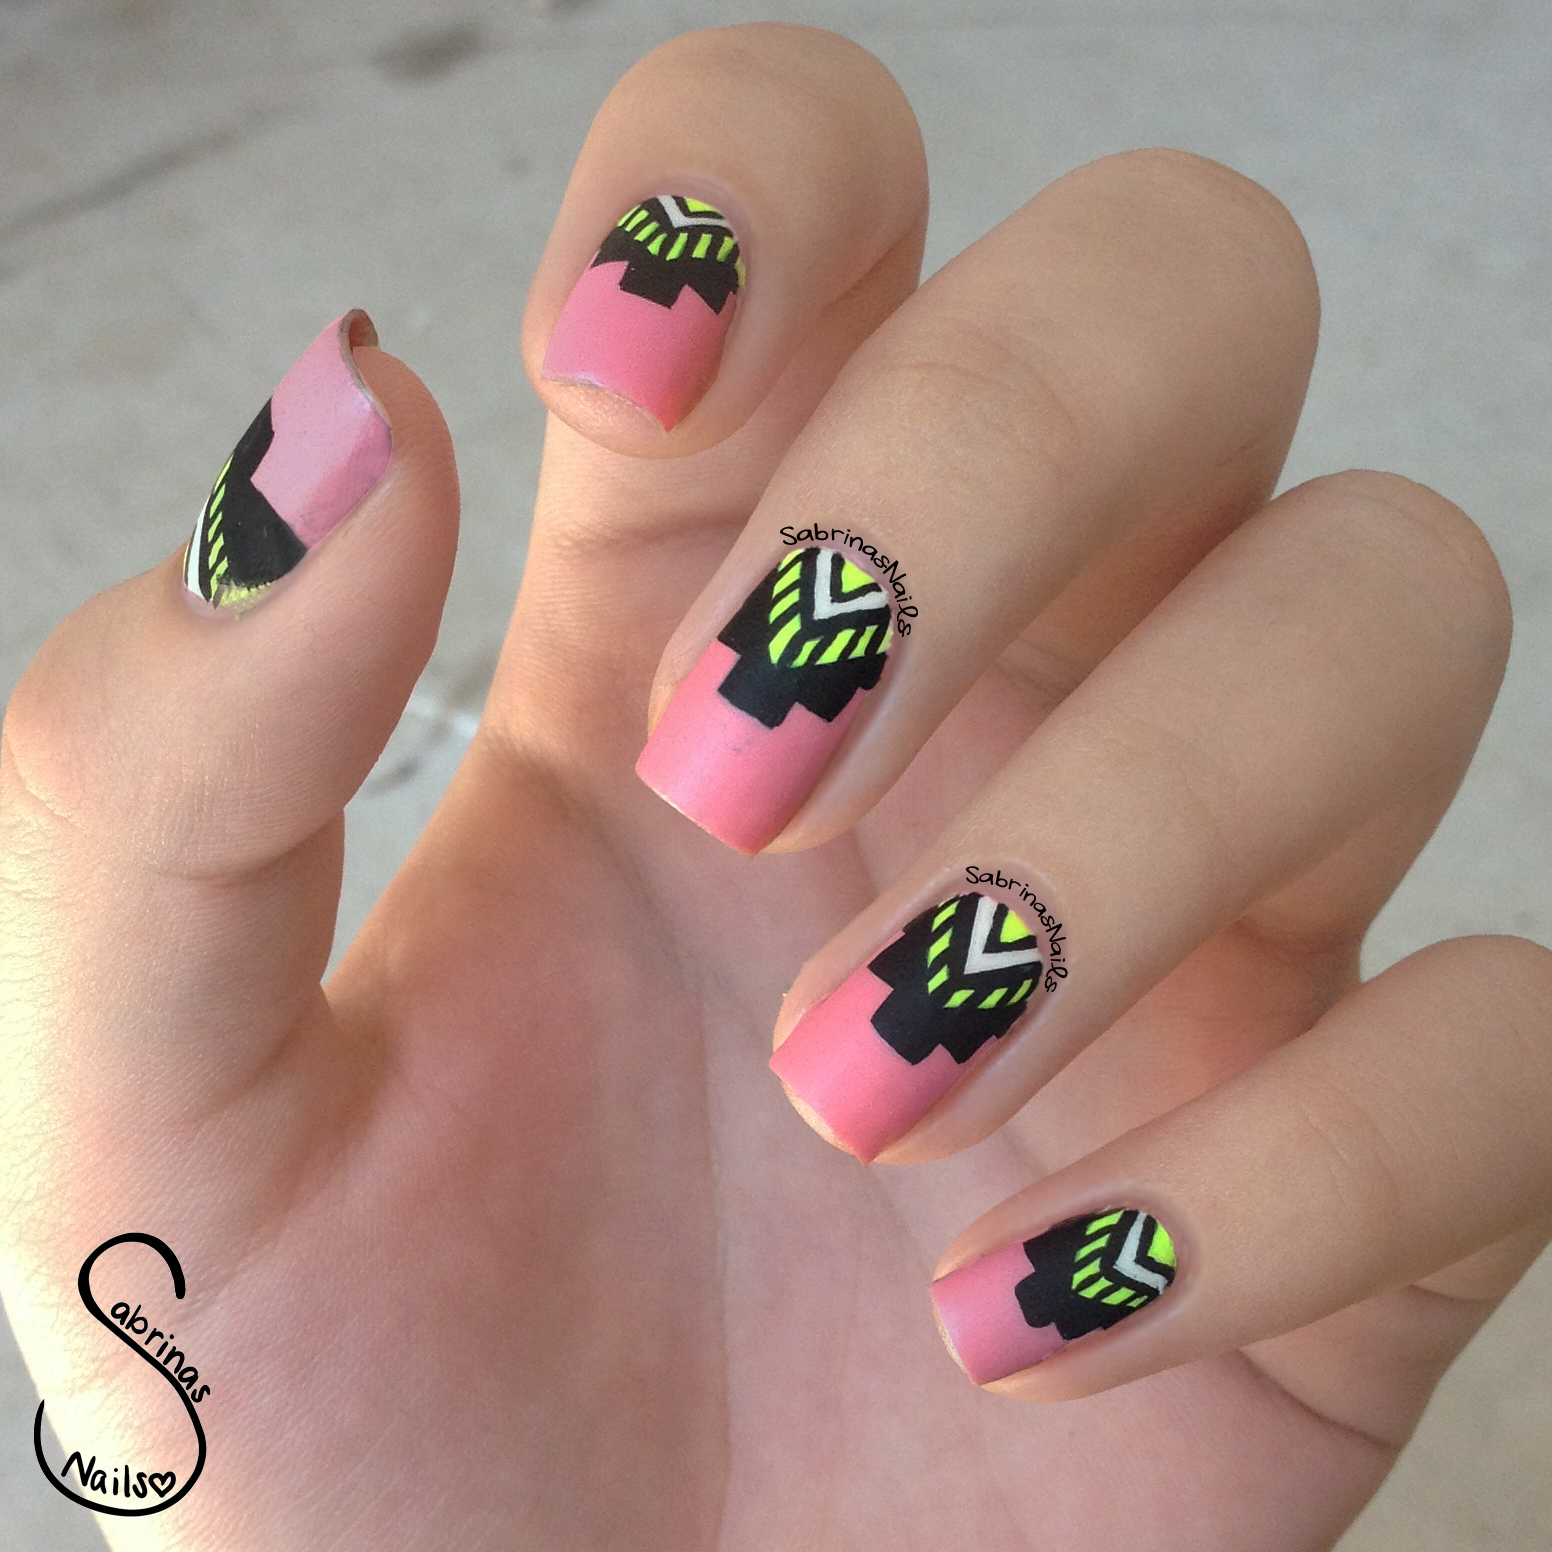


I began this mani with two coats of Love by Pure Ice. This is one of my favorite pink nail polishes because it is opaque with 1-2 coats, and it applies very smoothly. I've had this polish for about a year and it hasn't gotten thick or goopy. Not only is it inexpensive, it is also pretty high quality in my opinion.
When that dried, I grabbed my white nail art striper and created a triangle near my cuticle. Then with the black striper I added details, such as lines, squares and a smaller triangle. I made sure to have a steady hand when creating these fine lines, I needed to stay concentrated in order for the design to look clean in the end.
So far this mani was just pink, black, and white. It was honestly very plain and I was racking my brain to try and figure out what would make it look better. I then realized that it needed some kind of pop! Orly's Glowstick would definitely do the job. I took a thin nail art brush and filled in the smallest triangle and the stripes. I think that the neon yellow was a great contrast to the rest of the colors.
I honestly think there's something wrong with me at this point. I feel the need to make every design MATTE! But c'mon, everything is better when it's matte, right? Being Sabrina, I slapped on OPI's Matte Top Coat as usual to give this mani a special look. I really love this and I hope you do too!
Thank you to Nicole28_ on Instagram for giving this design a name! Tribal City is a perfect fit because it sort of looks like a skyline, and it also is very tribal!
Wednesday, August 7, 2013
Flashy Lilac
My mind is still spinning from a One Direction concert I attended on Sunday, so I decided to have something simple yet cute on my nails. I recently bought my very first OPI nail polishes and I was very eager to try them for the first time today!


I began with four coats of You're Such A Budapest by OPI. This polish was surprisingly thin which was kind of a bummer, but the formula was very smooth which made up for it. You're Such A Budapest is a soft lilac color that is perfect for the spring and summer time. I would definitely wear this alone but I decided to add a touch of sparkle.
After letting this dry, I added one coat of Which Is Witch by OPI on top. I don't think I've said that I've added only one coat of something in a very long time, it's very refreshing! Which Is Witch is packed with holographic hex and bar glitters. This glitter top coat truly does sparkle like crazy when you're in the sunlight, it's going to bring you much attention!
I hope that you would all know by now that I am an absolute sucker for matte glitter. Not only is it easier to photograph, but it just adds something unexpected to any glitter mani. I finished this off with one coat of OPI's Matte Top Coat. A lot of you have been asking what the best matte top coat is, in my opinion this one by OPI is the best I've tried. It turns your nails matte right before your eyes in about 5 seconds, it's truly amazing! If you're looking for one that's more affordable, I would recommend NYC's Matte Me Crazy. It only costs a single dollar and it achieves similar results.
I hope I feel in the mood to do some nail art this week, I have some new polishes I want to try out! I hope you love this OPI combination, I know I do!
Thursday, August 1, 2013
Neon & Nude Leopard Print
After swatching for many days, I definitely missed having fun nail art on my nails. My dotting tools and brushes were calling my name! With many design ideas floating in my head, I decided to go with a very classic and simple design. When in doubt, go for some leopard print!

I started off with three coats of Porchester Square by Nails Inc. It definitely was fine with two coats but I just wanted to make sure that it was really opaque. The consistency was somewhat thick but a breeze to apply. After having it on my nails, it dried more of a wet cement color than nude, but it still has hints of brown. Although a nude color can seem very dull during the blazing summer time, adding a bright neon polish can definitely fix that problem!


I started off with three coats of Porchester Square by Nails Inc. It definitely was fine with two coats but I just wanted to make sure that it was really opaque. The consistency was somewhat thick but a breeze to apply. After having it on my nails, it dried more of a wet cement color than nude, but it still has hints of brown. Although a nude color can seem very dull during the blazing summer time, adding a bright neon polish can definitely fix that problem!
Once Porchester Square was dry, I added the leopard spots with Shocking Pink by China Glaze and Liquid Leather by China Glaze. Shocking Pink is a bright neon that dries matte. I also used it to create high bows on my thumb and ring finger. For a tutorial on my bows click here.
Since I recently purchased OPI's Matte Top Coat, I definitely wanted to try it out! I turned this look matte by first applying my trusty Seche Vite Top Coat which gave this design excellent shine. I only added this top coat to make sure my nails would last. When that dried, I counteracted the shine with the matte top coat that I was extremely impressed by. It made my nails matte within 8 seconds! I love this design even better matte, than I did when it was glossy.
Overall I think this design was a great choice for a nail art comeback. Neon and nude has been a very popular color scheme lately and it feels good to finally have it on my nails! Try this design yourself sometime and feel free to choose whatever neon color you want! I'd love to see this done with a highlighter yellow or bright blue! If you recreate this or any of my other designs, use the hashtag #inspiredbysabrinasnails on Instagram or send me the picture through Kik or Email and you could be featured on my Your Recreations page, here on my blog!

Thursday, July 11, 2013
Summer Neons Haul
Today I dropped by Sally's Beauty Supply for a little early birthday haul! I was on the mission for some bright colors and I must say.. mission accomplished!

.JPG)

.JPG)
.JPG)
Since it's summer time in California, bright colors are perfect for the season. For the last few months I've been stocking up on spring pastels, now it's time to collect neons! I already own a few, like China Glaze's Orange Knockout and I'm With the Lifeguard. But I have definitely been missing these beauties in my life!
The first polish I got was Glowstick by Orly. I've been wanting this perfect highlighter yellow ever since I saw it on the talented @Jewsie_Nails! I'm not sure exactly what occasion this polish will be appropriate for, but I'll find a nice design to pair with it one day! I'm in love with this color and can't wait to put it on.
Up next is Shocking Pink by China Glaze. A polish I can finally cross off of my wish list! This is the perfect bright pink and I think it will look nice both on nails and toes! No other pink polish I have compares to this gorgeous color.
I also purchased Turned Up Turquoise by China Glaze! This is a beautiful turquoise that also has a very slight shimmer to it. I'm excited to be wearing this and to be creating summer gradients with this color.
Lastly, I bought Purple Panic by China Glaze. I don't have anything similar to this creamy magenta color. It's a bit more pink than it is purple but it's still wonderful.
I'm so excited that I was able to purchase these polishes today! I can't wait to swatch them and use them in my designs. If you own any of these nail polishes, let me know what you think about them!
Thursday, May 16, 2013
Coral Reef Swatch
Woohoo, my first official post on the blog! Today I swatched Coral Reef by Sally Hansen. I was a bit skeptical about this polish at first but it is so beautiful!
It's super creamy, easy to apply, and is opaque in two coats. Coral Reef is the perfect mix of pink and orange and it makes my hands look so much tanner than they actually are which is always a plus. I would really recommend this nail polish and it is not very expensive either, somewhere around $3 and it is completely worth it!
.jpg) |
| 2 coats of Coral Reef plus a topcoat. |
Subscribe to:
Posts (Atom)