Showing posts with label Matte. Show all posts

Sunday, January 5, 2014

#NailArtJan - Fresh

It was honestly really difficult to think of a nail design that is seen as "fresh." I first think of fresh air, freshly cut grass and fresh fruit, but I didn't really want any of those things on my nails. So I decided on fresh flowers. I had seen a design a few weeks ago by @OrlyNailGirls and completely fell in love. The design included a sheer background and crisp, white flowers on top of it.


To start, I grabbed the nail polishes that I needed. For the nudey-pink base, I used Essie's Mademoiselle. I also needed a white polish for the flower petals so I used Sinful Color's Snow Me White. Lastly, for the center of the flower I used Mellow Yellow by Sally Hansen Xtreme Wear. 


After painting my nails with two coats of Essie's Mademoiselle, I used a large dotting tool dipped in white polish to create a big flower at the top of my nail. As the flowers go down my nail and decrease in size, so do my dotting tools. I used a large, medium and small sized dotting tool for the flowers and a toothpick for the smallest daisy. 


Once the flowers were dry, I took Mellow Yellow and created small dots in the center of each flower. I then added a matte top coat and I'm done! I love this design and I think it looks very fresh and it's such a palette cleanser compared to all of the sparkly and intricate New Years nails. I hope you guys love these as much as I do and I hope you all had a fun and safe New Year! 

Monday, September 23, 2013

Matte Watermarble

After seeing @Mucking_Fusser do a watermarble design over a gradient the other day, I knew I had to try it! I'm definitely not as skilled as Corynn when it comes to watermarbling, but that doesn't mean I can't try!


I started off by creating a gradient on all of my nails. I applied Boom Boom Room by Essie (my all time favorite pink cream polish!) to the top of a makeup sponge, followed by Play Date by Essie to go underneath it. I then rolled and dabbed the sponge onto my nail to create this gradient effect! 


Once the gradient dried, I used Superstar! by Pure Ice and Orly's Sec N Dry for the watermarble that I put on top of the pink & purple. Check out Corynn's blog www.MuckingFusser.com for in depth watermarle tutorials! I topped off the design with Seche Vite and cleaned up the excess polish on my fingers with cotton swabs and nail polish remover.


This design looks great when shiny but I did add one coat of OPI's Matte Top Coat to this because it made this easier to photograph because there were no glares! I really do love how this looks when matte and I love this design in general. I do have to admit that this took quite a long time, (about 3 hours for both hands + clean up) but if you tape your fingers, I'm sure the process would go by much faster! 


I can't wait to try this design again with different color combinations and a more uniform watermarble! This mani will look good on almost every nail shape and length so please try it out! I hope you love this and have a fantastic day! 

Tuesday, August 13, 2013

Tribal City

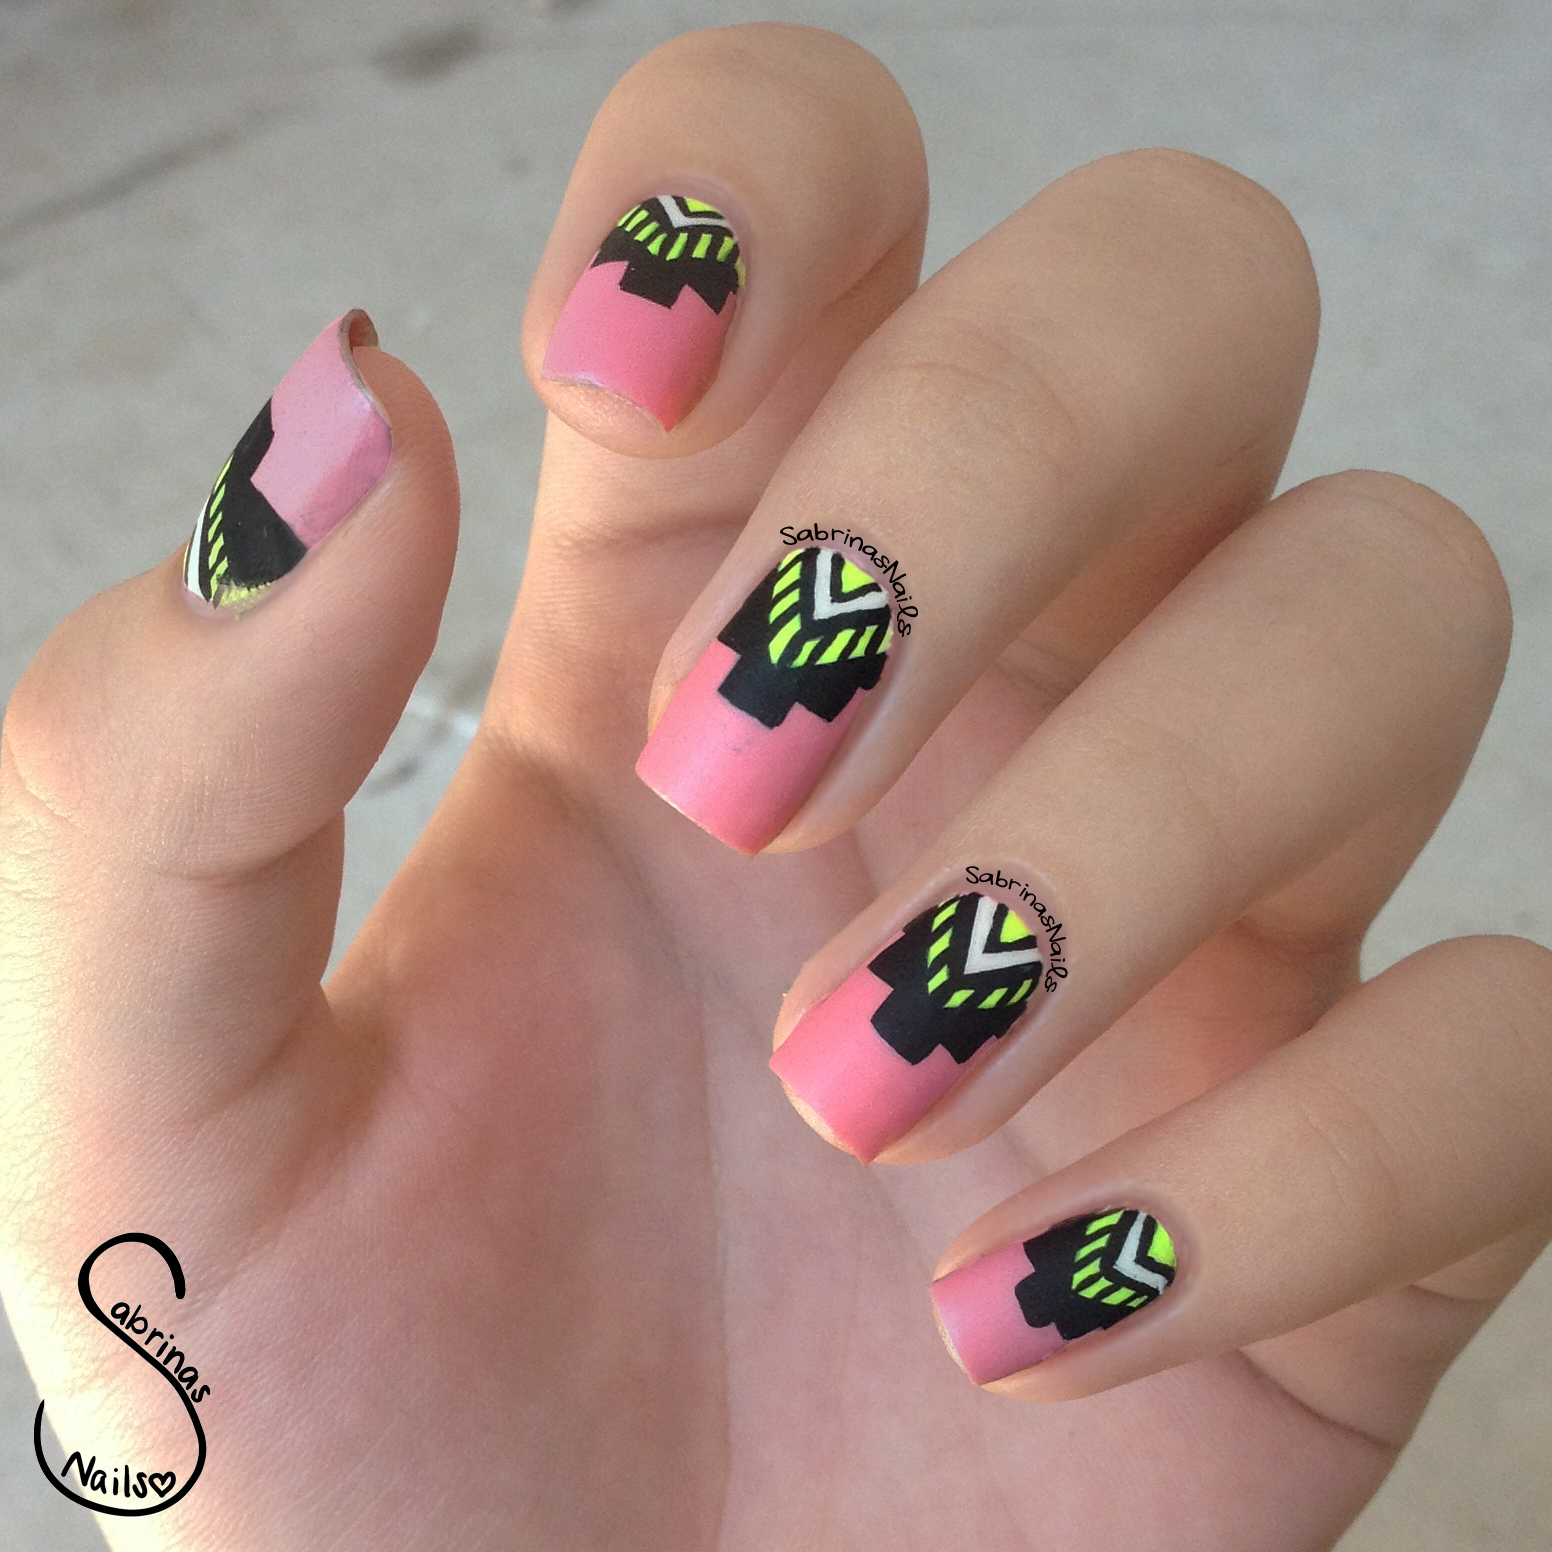
Wow, a lot of you guys on Instagram really loved this design when I posted it yesterday! I wasn't expecting such a positive response after an entire week of nail fails which was the reason for my 6 day absence. I'm not completely sure what inspired this design but I'm pretty pleased with how it turned out!


I began this mani with two coats of Love by Pure Ice. This is one of my favorite pink nail polishes because it is opaque with 1-2 coats, and it applies very smoothly. I've had this polish for about a year and it hasn't gotten thick or goopy. Not only is it inexpensive, it is also pretty high quality in my opinion. 


When that dried, I grabbed my white nail art striper and created a triangle near my cuticle. Then with the black striper I added details, such as lines, squares and a smaller triangle. I made sure to have a steady hand when creating these fine lines, I needed to stay concentrated in order for the design to look clean in the end. 


So far this mani was just pink, black, and white. It was honestly very plain and I was racking my brain to try and figure out what would make it look better. I then realized that it needed some kind of pop! Orly's Glowstick would definitely do the job. I took a thin nail art brush and filled in the smallest triangle and the stripes. I think that the neon yellow was a great contrast to the rest of the colors.


I honestly think there's something wrong with me at this point. I feel the need to make every design MATTE! But c'mon, everything is better when it's matte, right? Being Sabrina, I slapped on OPI's Matte Top Coat as usual to give this mani a special look. I really love this and I hope you do too!

Thank you to Nicole28_ on Instagram for giving this design a name! Tribal City is a perfect fit because it sort of looks like a skyline, and it also is very tribal! 


Wednesday, August 7, 2013

Flashy Lilac

My mind is still spinning from a One Direction concert I attended on Sunday, so I decided to have something simple yet cute on my nails. I recently bought my very first OPI nail polishes and I was very eager to try them for the first time today!


I began with four coats of You're Such A Budapest by OPI. This polish was surprisingly thin which was kind of a bummer, but the formula was very smooth which made up for it. You're Such A Budapest is a soft lilac color that is perfect for the spring and summer time. I would definitely wear this alone but I decided to add a touch of sparkle. 


After letting this dry, I added one coat of Which Is Witch by OPI on top. I don't think I've said that I've added only one coat of something in a very long time, it's very refreshing! Which Is Witch is packed with holographic hex and bar glitters. This glitter top coat truly does sparkle like crazy when you're in the sunlight, it's going to bring you much attention!


I hope that you would all know by now that I am an absolute sucker for matte glitter. Not only is it easier to photograph, but it just adds something unexpected to any glitter mani. I finished this off with one coat of OPI's Matte Top Coat. A lot of you have been asking what the best matte top coat is, in my opinion this one by OPI is the best I've tried. It turns your nails matte right before your eyes in about 5 seconds, it's truly amazing! If you're looking for one that's more affordable, I would recommend NYC's Matte Me Crazy. It only costs a single dollar and it achieves similar results. 

I hope I feel in the mood to do some nail art this week, I have some new polishes I want to try out! I hope you love this OPI combination, I know I do!


Thursday, August 1, 2013

Neon & Nude Leopard Print

After swatching for many days, I definitely missed having fun nail art on my nails. My dotting tools and brushes were calling my name! With many design ideas floating in my head, I decided to go with a very classic and simple design. When in doubt, go for some leopard print!


I started off with three coats of Porchester Square by Nails Inc. It definitely was fine with two coats but I just wanted to make sure that it was really opaque. The consistency was somewhat thick but a breeze to apply. After having it on my nails, it dried more of a wet cement color than nude, but it still has hints of brown. Although a nude color can seem very dull during the blazing summer time, adding a bright neon polish can definitely fix that problem!


Once Porchester Square was dry, I added the leopard spots with Shocking Pink by China Glaze and Liquid Leather by China Glaze. Shocking Pink is a bright neon that dries matte. I also used it to create high bows on my thumb and ring finger. For a tutorial on my bows click here.


Since I recently purchased OPI's Matte Top Coat, I definitely wanted to try it out! I turned this look matte by first applying my trusty Seche Vite Top Coat which gave this design excellent shine. I only added this top coat to make sure my nails would last. When that dried, I counteracted the shine with the matte top coat that I was extremely impressed by. It made my nails matte within 8 seconds! I love this design even better matte, than I did when it was glossy. 


Overall I think this design was a great choice for a nail art comeback. Neon and nude has been a very popular color scheme lately and it feels good to finally have it on my nails! Try this design yourself sometime and feel free to choose whatever neon color you want! I'd love to see this done with a highlighter yellow or bright blue! If you recreate this or any of my other designs, use the hashtag #inspiredbysabrinasnails on Instagram or send me the picture through Kik or Email and you could be featured on my Your Recreations page, here on my blog!

Freak Show Polish: Three-Ringed Circus

Three-Ringed Circus is a white jelly polish filled with red, black, and white glitters of many shapes and sizes, made to represent the flair that you find in the circus!


I did use the same base polish as I used when swatching Strongman II. I used four coats of I Will! by L'oreal and to prevent picture spam of the same polish, I did not insert the same pictures. To see the white polish, look at the blog post right before this one! 


I love how simple yet elegant and fun this polish is, it really looks nice against the white base. It even looks more beautiful close up!


Here's my final rating of this polish:

Application: Normal, no problems with it.

True to Color: Yes, colors are very bright.

Dry Time: 2-3 minutes.

Consistency: On the thicker side but not an issue to work with.

Coats Until Opaque: With two coats, the small red glitters were all over the nail, I did have to place on some of the circle glitters myself because I wanted a big circle glitter on each nail. 

Additional Comments: This polish definitely holds the essence of the circus while still being sophisticated. 

Final Rating: 7/10

To purchase, visit FreakShowPolish.com or visit Carissa's Instagram (Instagram.com/FreakShowPolish) to view more swatches and polishes!

Freak Show Polish: Strongman II

To be honest, I was hesitant when trying this polish on. I didn't know how much different it would be to Strongman I. I'm happy to say that I was pleasantly surprised!


I started off with 4 coats of I Will! by L'oreal. It's one of the best white polishes I've tried so far! It's not thick or troublesome, it's thin but opaque. I could've gone with three coats but I'm a bit crazy and had to add an extra layer. 


When the white polish dried, I topped it off with two coats of Strongman II by Freak Show Polish. I was absolutely blown away with how this looked! It was very similar to Strongman I but unique in it's own special way. 


As you can see, it is gorgeous and looks different in different lighting. I love the large circle glitters and the smaller hexes, it is absolutely perfect and my favorite from all of the polishes that Carissa sent me.


Up close, you can tell that this polish is a glitter bomb. You will be getting tons of compliments if you wear this! Here's my rating of this polish:

Application: This polish isn't lumpy or thick, went on with ease.

True to Color: Yes, the glitter is just as vibrant as in the bottle. 

Dry Time: 1-2 minutes.

Consistency: Normal.

Coats Until Opaque: With two coats, the glitter was mostly everywhere on the nail. I did place a few on myself just because I really love my nails to sparkle. 

Additional Comments: This is up there with one of my favorite polishes I own! I will be wearing this all the time, I love how the bright glitter contrasts against the white base. You will not regret purchasing this!

Final Rating: 10/10

To purchase, visit FreakShowPolish.com or visit Carissa's Instagram (Instagram.com/FreakShowPolish) to view more swatches and polishes!

Freak Show Polish: Trapeze Swinger

Carissa describes this polish as a "...milky white jelly full of periwinkle hexes in various sizes and small green hexes." I couldn't have explained it better myself! It looks gorgeous in the bottle.


I began this mani with three coats of Bikini So Teeny by Essie, probably a favorite polish by most nail freaks like me! Unfortunately for me, I think I have a bad bottle of this stuff because ever since I first purchased it, it's been thick and hard to work with. I do try to make it look decent and hopefully I've succeeded!


One coat of Seche Vite really smoothed out the thickness of this polish and made it look sleek and effortless. This was the perfect base for Trapeze Swinger!


My nails feel very bright and fun with this polish on! These look great in the sunlight, every piece of glitter picks up the suns rays and reflects them to make your nails feel like a disco ball! 


Up close you can really see all of the different glitters that are in this nail polish. Here's my rating of this polish:

Application: This polish was a breeze to apply.

True to Color: I definitely thought this was a light blue jelly polish from looking at the bottle. Turns out that it's actually a white jelly, but that just means that you can layer it over more colors and it definitely goes well over Essie's Bikini So Teeny! 

Dry Time: 1-2 minutes.

Consistency: Normal, no issues with it.

Coats Until Opaque: It was definitely filled with glitter with 1 coat but I really wanted it to sparkle, so I added one more. 

Additional Comments: If you love blue, you'll like this nail polish and it's gorgeous sparkle. 

Final Rating: 8/10

To purchase, visit FreakShowPolish.com or visit Carissa's Instagram (Instagram.com/FreakShowPolish) to view more swatches and polishes!

Tuesday, July 23, 2013

Freak Show Polish: Circus of the Sun

Circus of the Sun is a shimmery orange polish with bright orange glitters mixed inside as well. This polish reminds me of gold and I couldn't wait to put it on!


I first applied 4-5 coats of Let's Meet by Sinful Colors. I would usually wear this polish as a topper but I really didn't mind the building up of coats which others might find annoying. I really love the outcome, it feels like I'm wearing the sun on my nails! I haven't worn a bright color like this in a while and it feels great!


I probably should've worn a more orange base but this one looked fine under two coats of Circus of the Sun. I love the way this looks, it makes my nails feel like summer!


Besides my awkwardly chipped nail, this polish looks amazing up close! 


Here is my rating of this polish:

Application: Very easy to apply even though the brush to my sample bottle popped off of the cap :(

True to Color: Completely true to color.

Dry Time: 2-4 minutes.

Consistency: Smooth, not clumpy or goopy. 

Coats Until Opaque: On its own probably 3-4 coats. 

Additional Comments: If you want to feel like you have gold on your nails, get this nail polish! 

Final Rating: 8/10

To purchase, visit FreakShowPolish.com or visit Carissa's Instagram (Instagram.com/FreakShowPolish) to view more swatches and polishes!