Hey everyone! This will be a short and sweet post but I just wanted to share my finished design with you all :) I haven't done any watermarbling in such a long time and I've really been wanting to try it again so I thought this would be the perfect time to get back into it!
Showing posts with label Gradient. Show all posts
Sunday, March 9, 2014
Tuesday, March 4, 2014
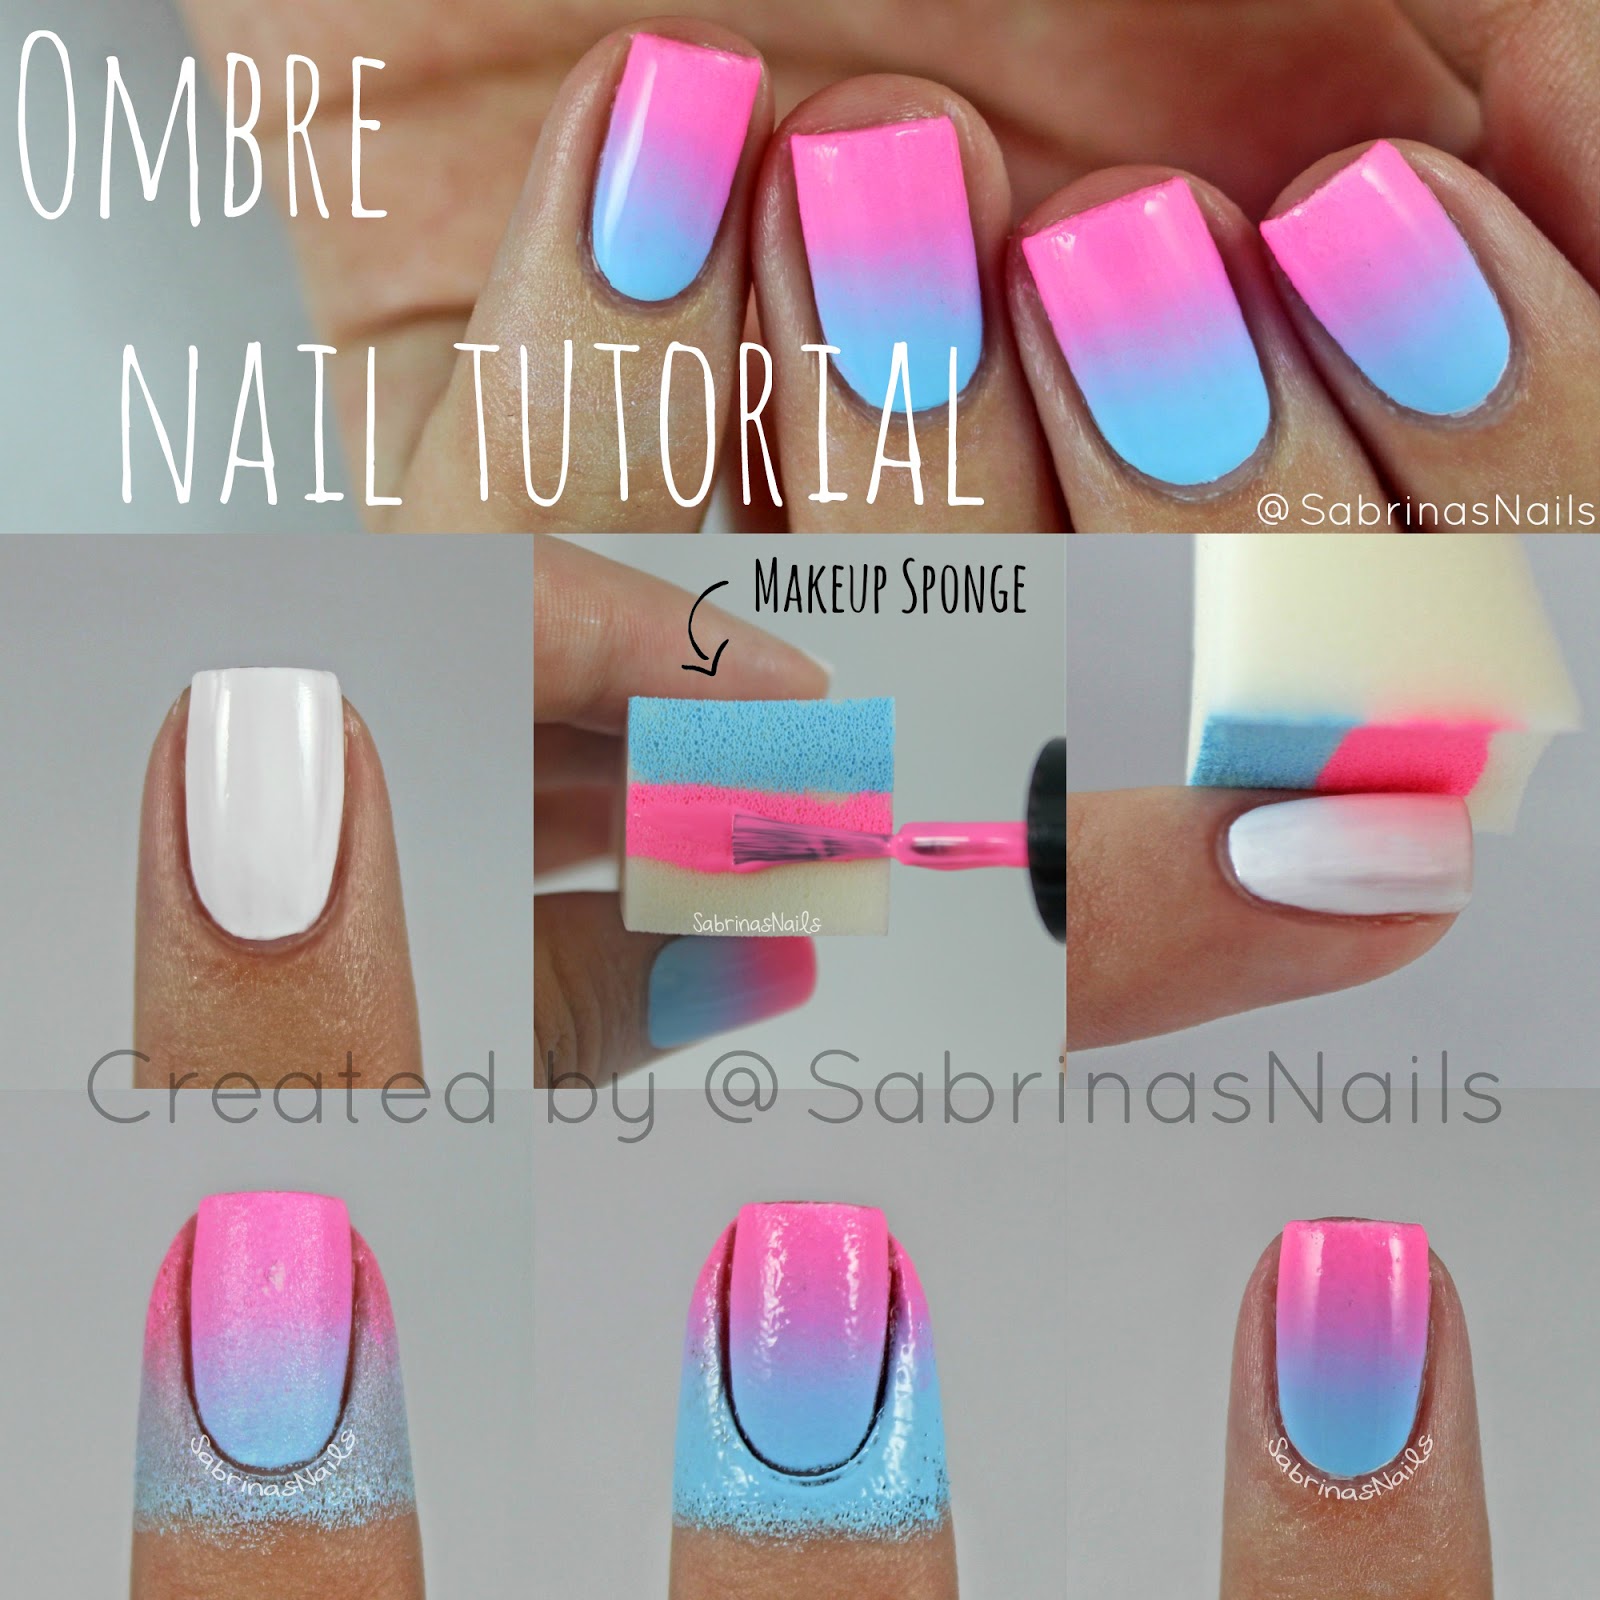
Ombre Nail Tutorial!
Happy Tuesday! Today I have an Ombre Nail Tutorial to share with you :) I'm honestly becoming obsessed with creating pictorials, they're so fun to make! Enjoy!
Monday, March 3, 2014
Cotton Candy Ombre Nails
Hi everyone! Today I have sort of a 'part one' to some nail art I'm working on :) These bright ombre nails are my base for something I'll be posting on Wednesday! These were really fun to do and I hope you like them!
Wednesday, December 4, 2013
Silver Glitter Gradient + New Nail Shape!
Hello everyone! Today I have a really simple design and a brand new nail shape. I decided to switch to almond shape nails after ogling Christine's gorgeous nails for a few months now. Not sure how long I'll have this shape for but I'll enjoy it while it lasts!
On my nails I have a silver glitter gradient over a sheer pink. This look is extremely elegant and perfect for a wedding, holiday parties or any time you want some glam nails!
I started this look with three thin coats of Mademoiselle by Essie. Mademoiselle is a new polish of mine and I really love it. It's sheer enough so you can slightly see your nail, but it's opaque enough to cover any stains I have on my nail. After the sheer polish was dry, I took Tiara by Orly and a makeup wedge and sponged the fine silver glitter onto 3/4 of my nail.
To add even more glitter, I sponged on Set In Stones by Essie to the tips of my nails. Finally, I added one coat of Seche Vite to seal all of that glitter in! I am honestly in love with these nails and I want to keep them on forever! I hope you like them too :)
Tuesday, November 19, 2013
Roses & Glitter Accents
I've recently been inspired by a few pink Essie colors in my collection. After staring at my polishes thinking of what design I could do, I was always drawn back to Muchi, Muchi, Boom Boom Room, and Mod Square, all by Essie! I finally decided on roses, and glitter gradients for my ring fingers.
I first painted my nails with four thin coats of Essie's Muchi, Muchi. This polish is sheer and sometimes hard to work with, but when you start to build a few layers of it, you get a smooth, light pink color! Once that dried, I took a large dotting tool and dipped it into Essie's Boom Boom Room. I placed three large dots toward the cuticle and let them dry. Next, I took Essie's Mod Square and a smaller dotting tool, to create the curved petals on the roses. With a dark green polish and the smallest dotting tool that I own, I made little tear drop shapes in arbitrary areas around the roses to act as leaves! The nail looked empty with just roses on it so at the last minute I took my white striper by Stripe Rite and created vertical lines on my nail. If stripes were to originally be in my design, I would've done them first to avoid accidentally overlapping the roses!
I was really interested to play around with Jetset In My Sunset by Curtsy and Bow. After swatching it on a piece of paper to see how much glitter I could get in one stroke, I realized that the formula on this polish wasn't so great. With one swipe, I got about two pieces of glitter, which is a shame because the gold hex glitters are gorgeous! After experimenting with this polish, I realized that I could create a glitter placement gradient (that's a mouthful) on my ring finger!
I began by dumping some of the polish out on a piece of paper (aka an old magazine I found lying around). With a toothpick, I grabbed each glitter individually and placed them heavily toward the cuticle of my nail. The further down I went, the less glitter I would add, until it looked like a gradient! The clear base in this polish helped the glitter stick to my nail. If you're using completely loose glitter, add a topcoat on your nail (to help the glitter adhere to your nail) and also dip your toothpick in topcoat to make the process of picking up glitter much easier!
I hope you liked this design as much as I did and I hope you try it out for yourself! If you do, use the hashtag #InspiredBySabrinasNails or send me a picture through Kik or Email! Thank you and have a lovely week (:
Wednesday, November 13, 2013
Nude to Blue Gradient
I was inspired by the gorgeous bright blue color (St Thomas Blue Me Away) that CurtsyandBow sent me, that I decided it was finally time for me to try a nude to color gradient. I have seen the trend everywhere and I think it's so pretty!
I began by applying two coats of a nude base (Trade Winds by Revlon) on my nails. Once that was dry, I took Trade Winds and St Thomas Blue Me Away and painted two horizontal stripes next to each other on a cosmetic wedge and sponged the colors onto my nail. This technique creates a flawless gradient every time! To help the colors blend and to add some sparkle, I added a coat of Fairy Dust by China Glaze, followed by one coat of Seche Vite.
I think these turned out really nicely and I'm excited to try this again with different colors! If you'd like to purchase St Thomas Blue Me Away, please visit www.CurtsyandBow.com! If you try this design out, use the hashtag #InspiredBySabrinasNails or send the picture to me by Email or Kik! Have a marvelous day :)
Saturday, November 2, 2013
Gradient Triangles
My sister and I decided to have a "Nail Painting Day" to paint our nails with a similar design. We decided on a design that we've been seeing everywhere on Instagram and Pinterest. There's no specific name for them but they look like triangles that start near the cuticle.
I started this design with two coats of white polish topped with Seche Vite for faster dry time. Since I used tape for this mani, I had to wait about an hour until the white polish was completely dry or else once the tape is added, it will pull polish up with it. Once the polish was dry, I added two strips of tape starting from the cuticle and meeting up with each other to create a triangle. I then applied a dark purple polish ( Spontaneous by China Glaze), a medium purple polish (Play Date by Essie), and a light purple polish (Sweet Hook by China Glaze) onto a cosmetic wedge and started to sponge it onto the nail. After a few coats of sponging and a coat of Fairy Dust by China Glaze, I carefully peeled the tape off to reveal crisp lines on the triangle. I added one coat of Seche Vite and Voila! They're finished!
As I mentioned earlier, my sister also did her nails but she decided to do a pink gradient instead of purple. She followed the exact same steps as I did but her dark pink polish was Mod Square by Essie, her medium pink polish was Boom Boom Room by Essie, and her light pink polish was Muchi Muchi by Essie. We both loved how these turned out and kept these on for as long as we possibly could (a little over a week)! If you try these out, use the hashtag #InspiredBySabrinasNails or send the picture to me though Email or Kik! I'll see you next time!
Saturday, October 12, 2013
Soothing Dreamcatchers
Not only do dreamcatchers help filter out bad dreams, but they also look really cute on your nails! I've seen dreamcatcher nails everywhere lately and decided to finally hop on the bandwagon! They were much simpler than I thought they would be and they turned out nicely along with a white to lavender ombre on the other nails.
The lavender color I used is Sweet Hook by China Glaze, it's a creamy light purple that is opaque in two coats. I also sponged on white for the ombre with Superstar! by Pure Ice and topped it off with Fairy Dust by China Glaze. To create the dreamcatcher I first used a black striper to create a half circle at the top of my nail and then filled it in with cross hatching. I also added three lines at different lengths to act as the string to hold all of the accessories on the dreamcatcher. Finally, I drew on pink and yellow beads and added brown feathers to complete the look! You can really customize these nails however you want, you change the background color, the amount of feathers and beads, and you can also change the design that goes inside of the half circle! If you try these out, use the hashtag #inspiredbysabrinasnails and tag me in the Instagram photo, or send me the picture through Kik or email! Have a great day!
Monday, September 23, 2013
Matte Watermarble
After seeing @Mucking_Fusser do a watermarble design over a gradient the other day, I knew I had to try it! I'm definitely not as skilled as Corynn when it comes to watermarbling, but that doesn't mean I can't try!
I started off by creating a gradient on all of my nails. I applied Boom Boom Room by Essie (my all time favorite pink cream polish!) to the top of a makeup sponge, followed by Play Date by Essie to go underneath it. I then rolled and dabbed the sponge onto my nail to create this gradient effect!
Once the gradient dried, I used Superstar! by Pure Ice and Orly's Sec N Dry for the watermarble that I put on top of the pink & purple. Check out Corynn's blog www.MuckingFusser.com for in depth watermarle tutorials! I topped off the design with Seche Vite and cleaned up the excess polish on my fingers with cotton swabs and nail polish remover.
This design looks great when shiny but I did add one coat of OPI's Matte Top Coat to this because it made this easier to photograph because there were no glares! I really do love how this looks when matte and I love this design in general. I do have to admit that this took quite a long time, (about 3 hours for both hands + clean up) but if you tape your fingers, I'm sure the process would go by much faster!
I can't wait to try this design again with different color combinations and a more uniform watermarble! This mani will look good on almost every nail shape and length so please try it out! I hope you love this and have a fantastic day!
Tuesday, July 9, 2013
Bestie Twin Nails With Filippa!
This week Filippa (@Filippa_Bengtsson) and I decided to do the famous Bestie Twin Nails tag! This is my third time doing the tag and it's honestly so much fun! After much chit chat about different designs, colors and
patterns, Filippa and I decided on doing white bows over a blue gradient. After a quick sketch, we both knew that it was the perfect design for us to do.
When we were both finished with our nails, it was actually quite freaky how similar they looked, haha. I am very pleased with how they turned out though. I think that Filippa did an excellent job!
![]() |
When we were both finished with our nails, it was actually quite freaky how similar they looked, haha. I am very pleased with how they turned out though. I think that Filippa did an excellent job!
For this design we decided on a blue gradient using Sunday Funday by China Glaze as our darkest color (since we both own that polish), topped with a bit of glitter, and two white bows outlined in black on our index and ring finger.
For the gradient I used a makeup sponge, Royally Yours by Loreal (light blue) and of course, Sunday Funday by China Glaze (dark blue.) I also topped it off with Fairy Dust by China Glaze to add touch of sparkle to the look. After that I painted white bows on two of my nails and outlined them with my striper brush in black. I hope you guys like this design and perhaps want to try it for yourself! Also don't forget to check out Filippas Instagram page, her username is @Filippa_Bengtsson!
Wednesday, May 29, 2013
Blue Gradient Animal Print
Haha I say the words "Animal Print" because I honestly don't know if these are cheetah or leopard spots! Anyway, the simplicity of this design almost kills me because I love looking at intricate drawings on my nails, but I still think this is very pretty.
I really love how these turned out and I'm surprised at how easy they were to do! I only needed four nail polishes and a few bobby pins to use as dotting tools. Colors used were:
(From left to right)
Royally Yours by Loreal, Sunday Funday by China Glaze, Tiara by Orly and Liquid Leather by China Glaze.
Subscribe to:
Posts (Atom)