

Showing posts with label China Glaze. Show all posts
Showing posts with label China Glaze. Show all posts
Saturday, May 3, 2014
Girly Nautical Nails!
What's up beautiful people? Today I have some super cool nails inspired by the wonderful Karissa from @LifeIsBetterPolished on Instagram! I recently saw her do some really pretty nautical themed nails and I knew I had to recreate them. I haven't done anything like this before and I really love it!
Sunday, April 27, 2014
Skimp or Spend? # 4
Long time no see! I'm so sorry that I've been gone for a week, I recently went on a mini vacation and that completely threw me off of my schedule! But I'm back with a new Skimp or Spend post :) Thank you guys for loving this series, I still get such amazing feedback from you all and I couldn't be happier. Continue reading if you'd like to find out the verdict of today's post!

Tuesday, April 15, 2014
Pastel Galaxy Nail Tutorial
What's up guys! It seriously feels like I haven't been on Instagram or my blog for a million years! I've recently been busy with school, homework, and this past weekend I spent in Disneyland so I've really had no time to do my nails or post anything :( But I'm back now and I finally have the Pastel Galaxy Pictorial that you guys have been highly requesting! Keep reading for the step by step instructions ♥
![]()

Sunday, April 6, 2014
Pastel Galaxy Nails
It's the second to last day of my Spring Break and I feel like I want to cry! I've gotten so used to relaxing all day, I don't want to go back to having responsibilities. Haha but the good news is that I have new nails for you! Today I have some pastel galaxy nails that I love! I've tried traditional galaxy nails twice before but I wanted to add a twist to these. These pastel colors make this design perfect for Spring!

Thursday, March 27, 2014
Spring Polish Picks!
Happy Spring! Since the first day of Spring was a few days ago, I thought it was time to share my Spring Polish Picks with you all! Spring is one of my favorite times of the year because of the nice weather and pastel polishes ♥ Keep reading to find out what my favorite nail polishes are for this season!

Tuesday, March 25, 2014
Fresh White Nails
Hey everyone! Tonight I'm posting something fairly simple, just fresh white nails, but I am joined by a fun ring to make this post more exciting! I've been feeling a bit uninspired lately so I went with a classic color. Not to worry though, I'm collabing with another nail artist on IG for a special post coming soon! :)

Tuesday, March 4, 2014
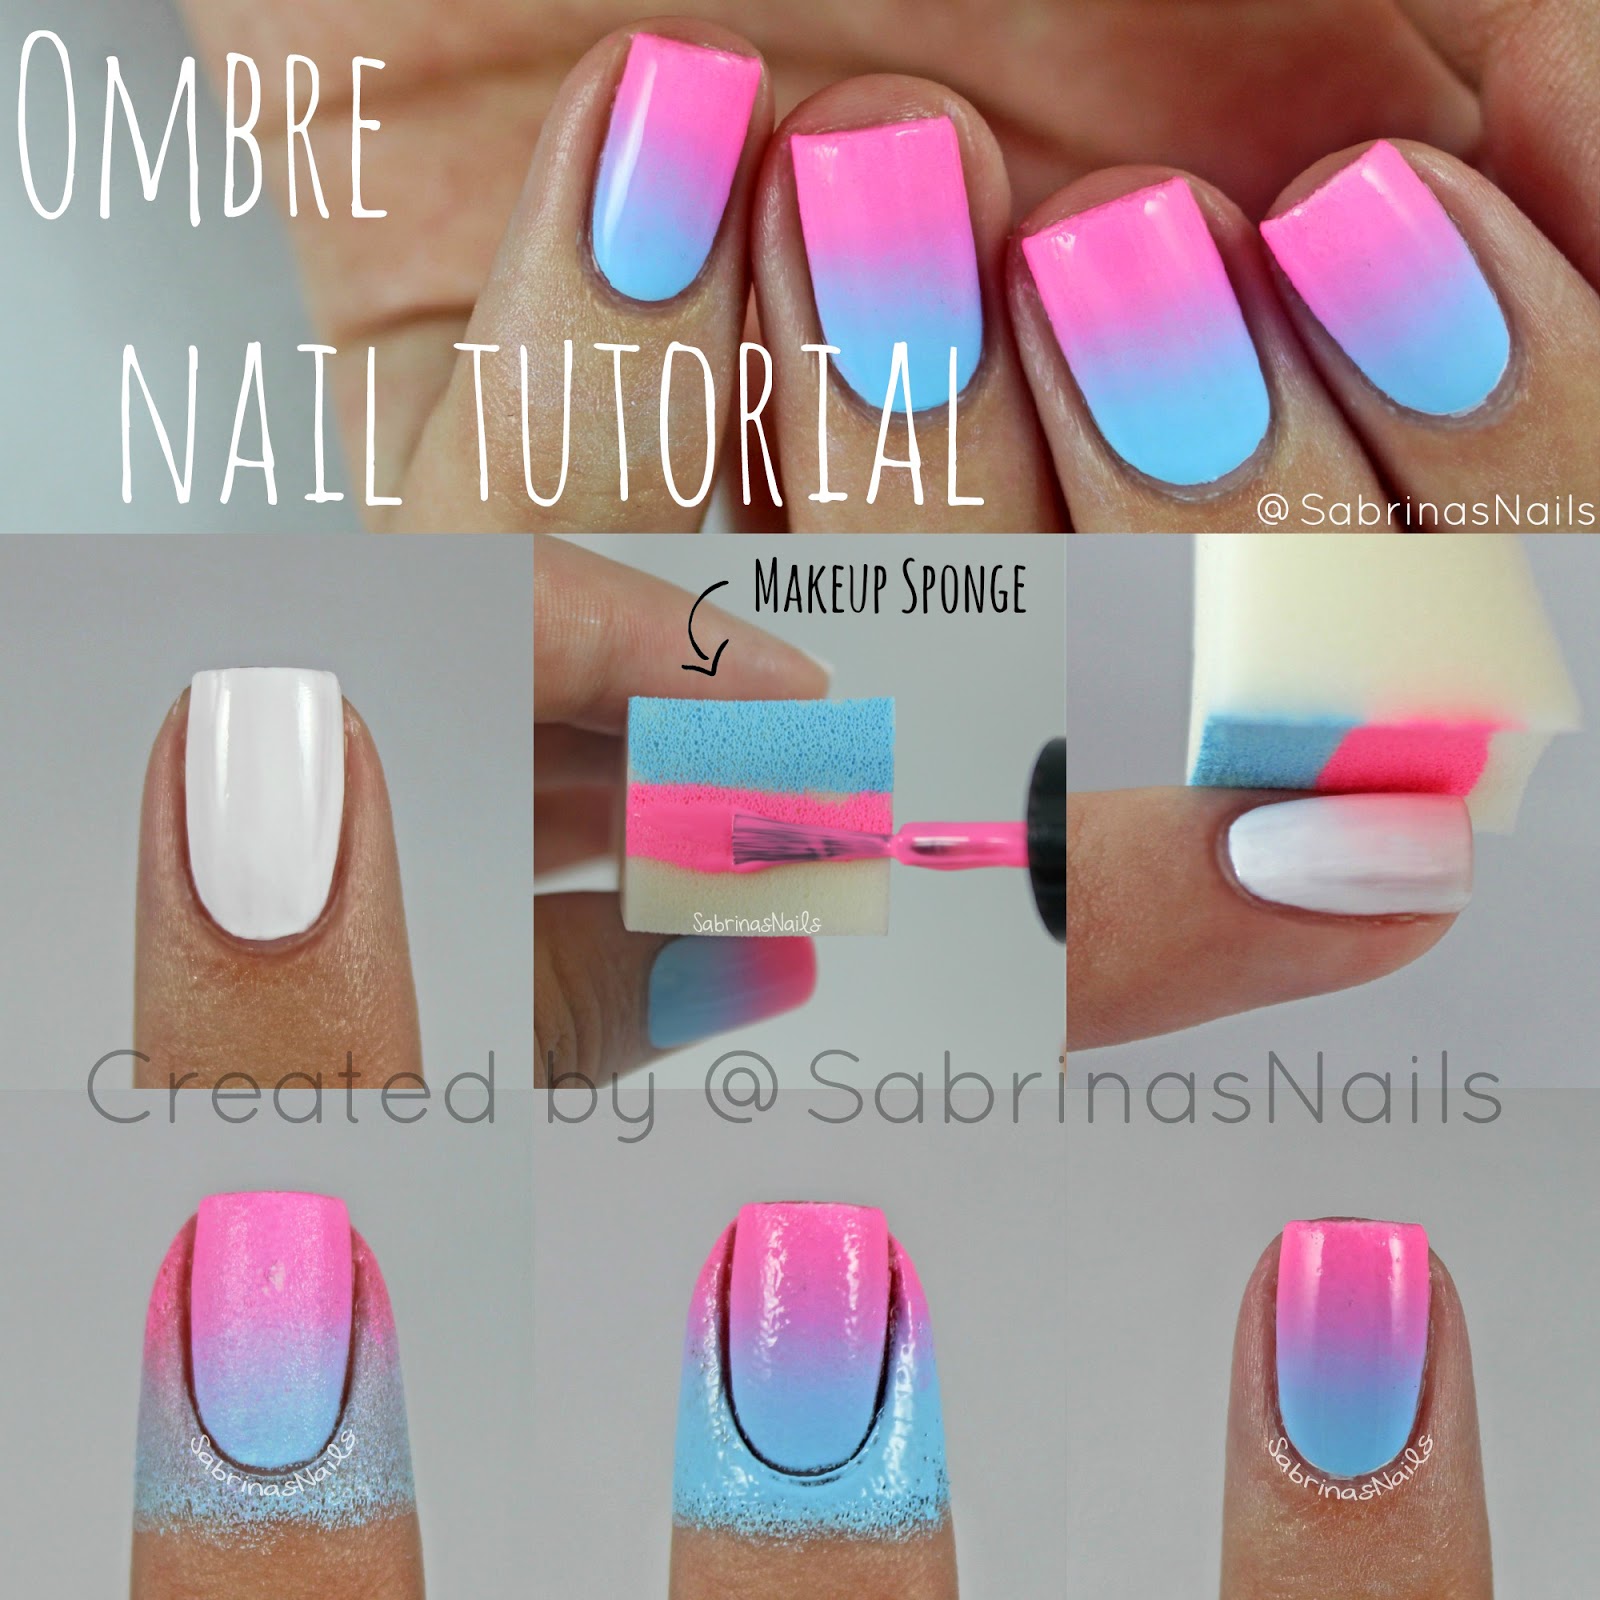
Ombre Nail Tutorial!
Happy Tuesday! Today I have an Ombre Nail Tutorial to share with you :) I'm honestly becoming obsessed with creating pictorials, they're so fun to make! Enjoy!
Monday, March 3, 2014
Cotton Candy Ombre Nails

Hi everyone! Today I have sort of a 'part one' to some nail art I'm working on :) These bright ombre nails are my base for something I'll be posting on Wednesday! These were really fun to do and I hope you like them!
Wednesday, February 19, 2014
Crisp Striping Tape Mani!
How is everyone doing? Today I am thrilled to share my newest nails with you! I recently saw a design by @Rachell_Rachell and fell in love! I've done something similar before on my sister but her design took it to the next level! I also took this as a great opportunity to use my new striping tape!
 |
| (Do you see the holo in that China Glaze polish?!?) |
Monday, February 10, 2014
Mix & Match Valentines Day Nails!
I am super excited about today's post! These nails are one of my all time favorites that I've ever done! :) Since Valentines Day is in just three more days, I knew that I had to create something for this occasion. I'm usually not one to do holiday themed nails but since V-day is all about hearts, the color pink and just cute things in general, I couldn't help myself ♥

Monday, February 3, 2014
Ruffian Nail Tutorial!
Today is the day that I get to share my pictorial with you all! Sorry that it has so many watermarks, I've had previous pictorials stolen before and they've been plastered with other people's Instagram usernames on top of mine so I wanted to make sure it wouldn't happen again. I spent so much time on this and I really hope you love it! :)

Sunday, February 2, 2014
Coral & Rose Gold Ruffian Nails

Good afternoon everyone! Right now I'm enjoying a Girls marathon (is anyone else in love with that show?!) and stressing out about how much homework I have on this gloomy Sunday evening, which means that this is a perfect time to procrastinate and blog :) Today I have some super cute ruffian nails to share with you that I'm honestly in love with. If you read yesterday's blog post, you'd know that I was thinking of adding a ruffian design on top of my swatch of Zelda by Julep, I tried it last night and they came out great!
Wednesday, January 29, 2014
Polishes I Received this Christmas!
Hey guys! I know Christmas was over a month ago but I never had the chance to show you all what polishes I received this past holiday. I'm so grateful for the friends and family that fed my polish addiction and I'm so excited to share my new pretties with you!
*Disclaimer* I am in no way trying to brag about things that were given to me. I simply want to share them with you and show you my collection as it grows. I love reading about what polishes people bought/ received so I thought this would be a good idea :) I also want to mention that this will be a picture heavy post!
To start, I'll show you polishes from one of my favorite brands, Essie! These polishes were given to me by my aunt, my friend Madi, and my mom!
 |
| From L to R: Off the Shoulder, Shake Your $$ Maker, Sable Collar & Using My Maiden Name |
Saturday, December 28, 2013
Diamonds In The Rough
Hi everyone! I had some time to spare yesterday and I decided to paint my nails! I've had this idea in my head for a while and I finally had the time to execute it last night. I used one of my new sparkly nail polishes that I got for Christmas and I really love it! I hope you like these nails as much as I do!


Once the white polish was dry, I took my black Stripe Rite striper and began by creating a diamond on a random spot on my nail. To make the diamond, I started by creating a black triangle. Then I painted a trapezoid on top of it with lines going through the trapezoid and triangle. It's really easy to figure out when you look at my nails, all of the diamonds are different shapes and sizes but have the same concept.


After my base coat, I began to paint my ring finger, middle finger and thumb with Superstar! by Pure Ice. This polish was difficult to work with, but after three coats it evened itself out and was streak-free. Since the layers came out thick, I allowed ten minutes for the polish to dry between coats.

As I was waiting for the white polish to dry, I began painting my index and pinkie finger with Some Like It Haute by China Glaze. I got this from my uncle for Christmas and I really REALLY love it (not only because of the adorable silver cap). Some Like It Haute is a clear base with small charcoal grey glitter with larger holographic glitter scattered through it. Because it has a clear base, this is five extremely easy coats of the nail polish. If you're impatient or running out of time, I would suggest to use grey undies but I really loved watching the layers build up and become opaque. I noticed that this polish dried rough, almost like a textured polish. I'm not sure if it's supposed to be worn like that but I did add one coat of Seche Vite to add shine.
 |
| The holographic glitter > |

Once one diamond is done, I drew more and more on arbitrary spots on my nail. You can't do this wrong! I seriously just painted a diamond wherever there was space. When the polish was dry, I added one layer of my favorite top coat! These nails really make me feel bad ass and I love it! If you try these out please use the hashtag #InspiredBySabrinasNails or send me the picture through kik or email. I hope you like these and become inspired, see you next time!

Saturday, November 23, 2013
Black & White Polka Dots With a Twist!
Hey! Today I was in sort of a rush so I wanted a nail design that was simple but still really cute. I decided on pink nails with black and white polka dot accent nails! This design was really easy to do and I hope you like it!
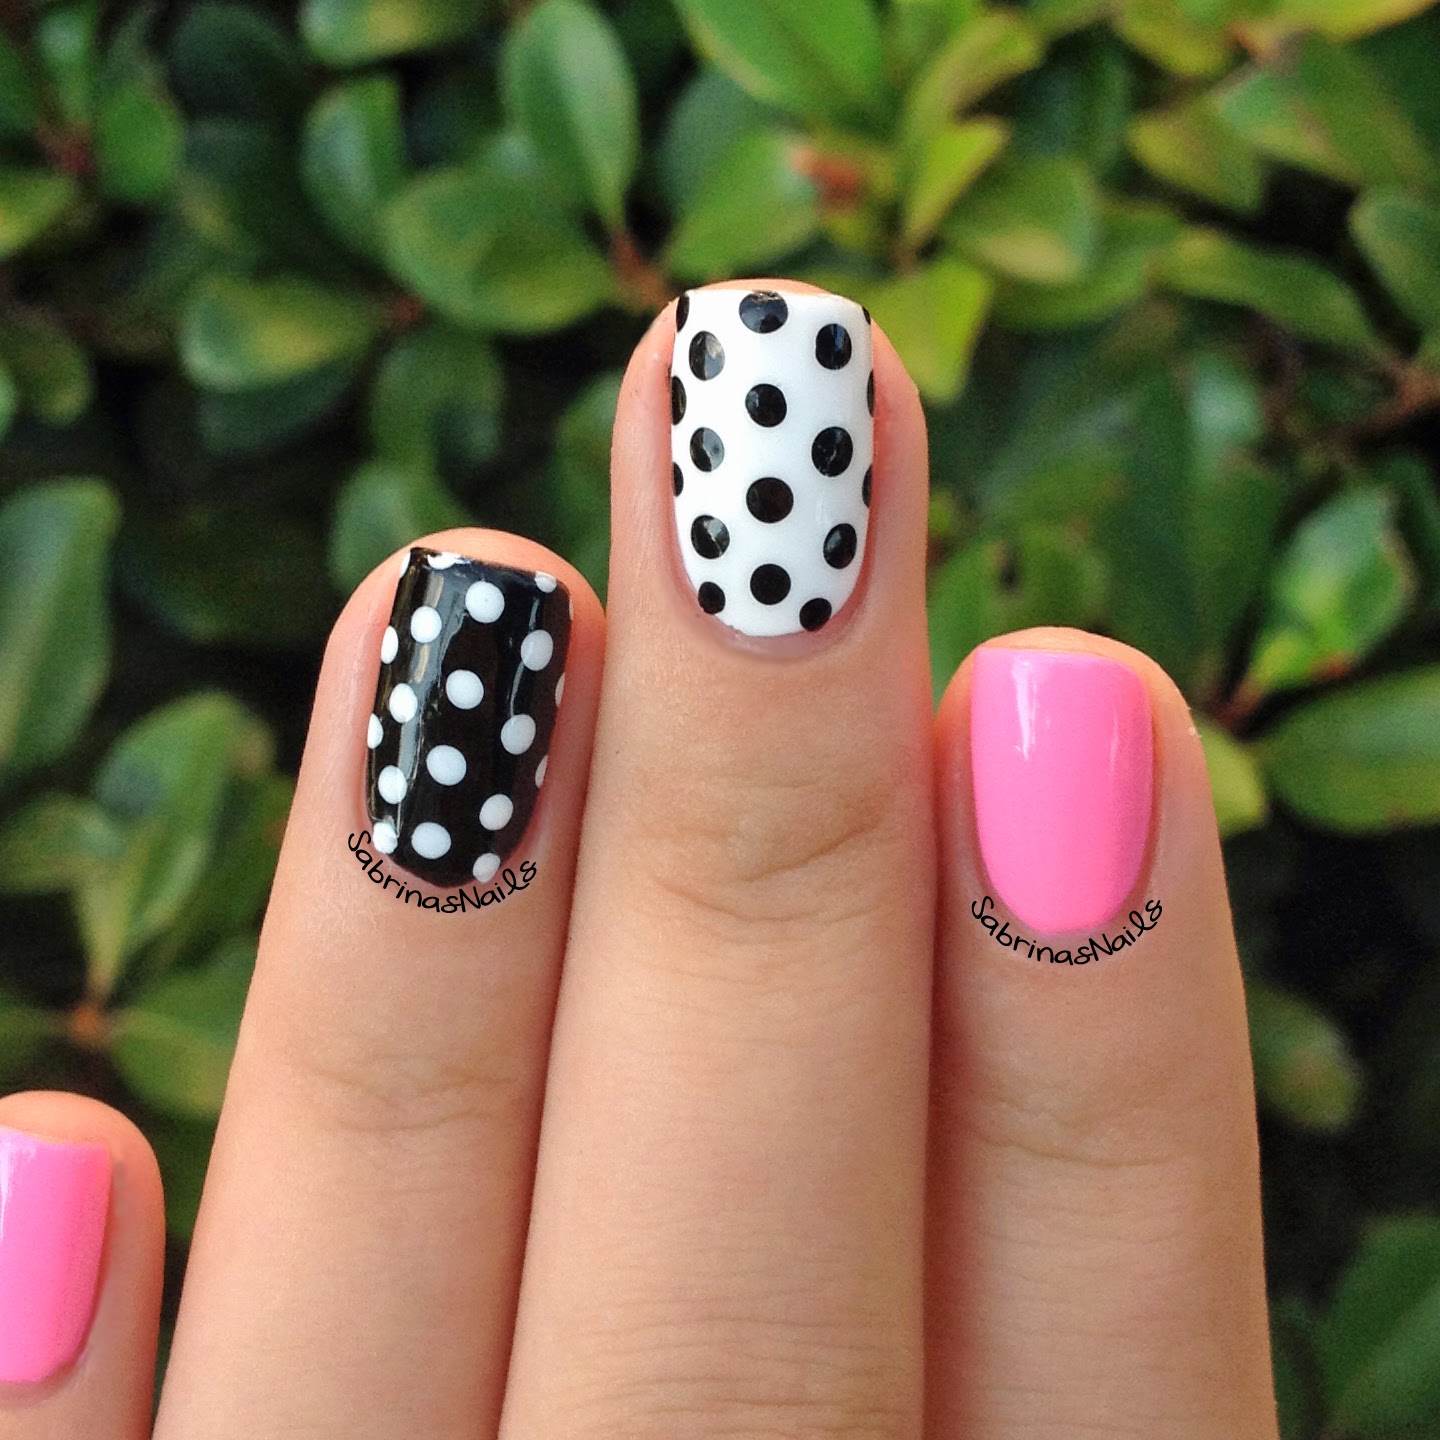
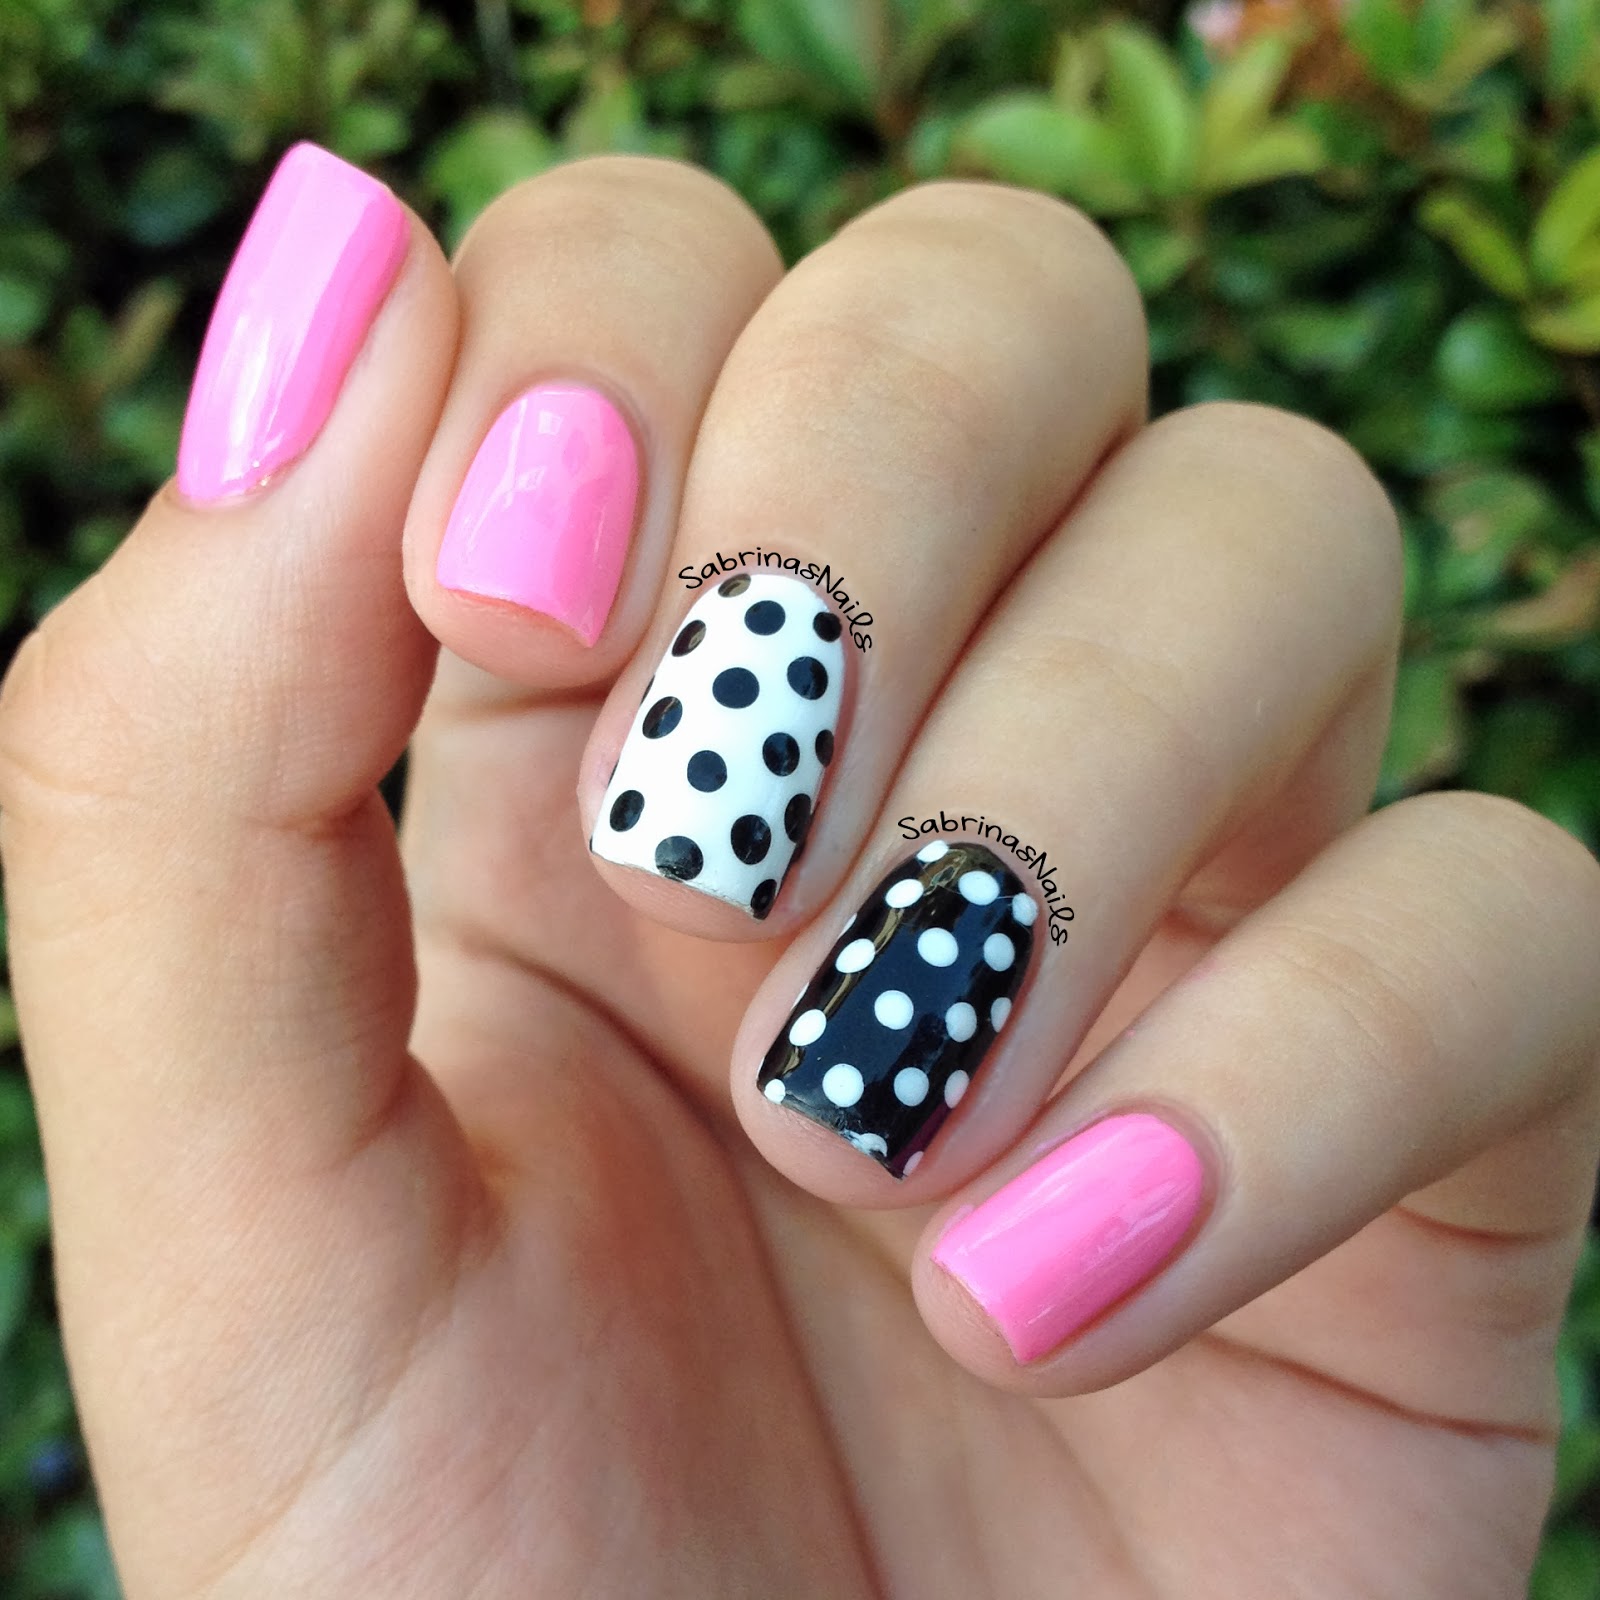


I began by painting my thumb, pinkie, and index finger with Essie's Boom Boom Room. I've talked about BBR so much since I've gotten it because it's my go-to pink polish. As always, the formula on this nail polish is perfection, opaque in two coats and it just glides on! This cream polish is amazing and I kind of feel bad for my other pink polishes because I use this one so much!
Next, I painted my middle finger with Superstar! by Pure Ice. It's not my favorite white polish but all of my other ones are streaky or thick. I then painted my ring finger with Liquid Leather by China Glaze. I feel like I've had this polish for years and it's still just as great as when I first bought it! It's opaque in two coats and it's also wonderful to use for nail art.
Finally, I used black to add polka dots to my middle finger and white to add polka dots to my ring finger. One coat of Seche Vite and it's done! These nails make me very happy despite the fact that my index finger nail is a bit broken :( I hope you like these and have a great day!
Saturday, November 2, 2013
Gradient Triangles
My sister and I decided to have a "Nail Painting Day" to paint our nails with a similar design. We decided on a design that we've been seeing everywhere on Instagram and Pinterest. There's no specific name for them but they look like triangles that start near the cuticle.


I started this design with two coats of white polish topped with Seche Vite for faster dry time. Since I used tape for this mani, I had to wait about an hour until the white polish was completely dry or else once the tape is added, it will pull polish up with it. Once the polish was dry, I added two strips of tape starting from the cuticle and meeting up with each other to create a triangle. I then applied a dark purple polish ( Spontaneous by China Glaze), a medium purple polish (Play Date by Essie), and a light purple polish (Sweet Hook by China Glaze) onto a cosmetic wedge and started to sponge it onto the nail. After a few coats of sponging and a coat of Fairy Dust by China Glaze, I carefully peeled the tape off to reveal crisp lines on the triangle. I added one coat of Seche Vite and Voila! They're finished!

As I mentioned earlier, my sister also did her nails but she decided to do a pink gradient instead of purple. She followed the exact same steps as I did but her dark pink polish was Mod Square by Essie, her medium pink polish was Boom Boom Room by Essie, and her light pink polish was Muchi Muchi by Essie. We both loved how these turned out and kept these on for as long as we possibly could (a little over a week)! If you try these out, use the hashtag #InspiredBySabrinasNails or send the picture to me though Email or Kik! I'll see you next time!

Saturday, October 12, 2013
Soothing Dreamcatchers
Not only do dreamcatchers help filter out bad dreams, but they also look really cute on your nails! I've seen dreamcatcher nails everywhere lately and decided to finally hop on the bandwagon! They were much simpler than I thought they would be and they turned out nicely along with a white to lavender ombre on the other nails.


The lavender color I used is Sweet Hook by China Glaze, it's a creamy light purple that is opaque in two coats. I also sponged on white for the ombre with Superstar! by Pure Ice and topped it off with Fairy Dust by China Glaze. To create the dreamcatcher I first used a black striper to create a half circle at the top of my nail and then filled it in with cross hatching. I also added three lines at different lengths to act as the string to hold all of the accessories on the dreamcatcher. Finally, I drew on pink and yellow beads and added brown feathers to complete the look! You can really customize these nails however you want, you change the background color, the amount of feathers and beads, and you can also change the design that goes inside of the half circle! If you try these out, use the hashtag #inspiredbysabrinasnails and tag me in the Instagram photo, or send me the picture through Kik or email! Have a great day!

Thursday, August 15, 2013
Dazzling Chevrons
I finally decided to try out the famous chevron mani by @SelenaDee_Nails on Instagram! This design is not only popular, but very simple and appealing. I thought this design would be perfect for the Jonas Brothers concert I was going to that day, yes I was totally there for their comeback, and they were just as great since the last time I saw them in 2008!


I swapped out the bright red that Selena used on her thumb, index and pinkie fingers for Essie's Butler Please, a rich blue. This was the first time I used my new polish and I was honestly a bit confused. To my surprise, Butler Please is a crelly polish! It applied like a cream but was somewhat sheer and dried matte. It was opaque in two coats but with one more coat it was much brighter.
When I know I'm doing a full silver glitter nail, I always apply one coat of a metallic silver polish first. I do this so that there won't be empty spots if the glitter doesn't cover my whole nail, meaning I'll need less coats of the glitter polish. My go-to glitter is Essie's Set in Stones, it's packed with sparkle and will never disappoint! I layered three coats of that over one coat of Silver Mercedes by Pure Ice, a metallic polish.
For the accent chevron nail I started off with a few coats of Superstar! by Pure Ice, a creamy white. This isn't my favorite white polish, its a bit old and thick. I thought I had grabbed I Will! by Loreal but realized I hadn't and was too lazy to walk a few steps to my room to switch them out, haha so I thought this would do. When doing this tape mani, you have to make sure the white is completely dry before moving on, or else the tape could ruin the wet nail. I added a coat of Seche Vite to speed up the drying time.
In the mean time I was cutting up the pieces of tape for this design. I don't own any zigzag scissors so I followed @Jewsie_Nails tutorial for her easy chevrons. Using a regular piece of tape I folded it (sticky sides out) and cut an angled line down the fold, and then did it once again to get a thin v-shaped piece of tape after I opened it up.
I placed the pieces of tape on my dry nail and pressed them down to make sure no pieces were oddly lifted up. Then I painted two coats of Liquid Leather by China Glaze on my whole nail and quickly but carefully lifted the tape off of my nail. Ta-da! You're left with a beautiful chevron accent nail! I used my black and white nail art stripers to clean up any empty/uneven lines and I had a very clean and pretty chevron.
One coat of Seche Vite on each nail and the design was done! I'm pleased with how this came out and I'm definitely doing more chevron manis in the future now that I know how to do them. I hope you all like this and try this out! Have a great day!

Thursday, August 1, 2013
Neon & Nude Leopard Print
After swatching for many days, I definitely missed having fun nail art on my nails. My dotting tools and brushes were calling my name! With many design ideas floating in my head, I decided to go with a very classic and simple design. When in doubt, go for some leopard print!

I started off with three coats of Porchester Square by Nails Inc. It definitely was fine with two coats but I just wanted to make sure that it was really opaque. The consistency was somewhat thick but a breeze to apply. After having it on my nails, it dried more of a wet cement color than nude, but it still has hints of brown. Although a nude color can seem very dull during the blazing summer time, adding a bright neon polish can definitely fix that problem!


I started off with three coats of Porchester Square by Nails Inc. It definitely was fine with two coats but I just wanted to make sure that it was really opaque. The consistency was somewhat thick but a breeze to apply. After having it on my nails, it dried more of a wet cement color than nude, but it still has hints of brown. Although a nude color can seem very dull during the blazing summer time, adding a bright neon polish can definitely fix that problem!
Once Porchester Square was dry, I added the leopard spots with Shocking Pink by China Glaze and Liquid Leather by China Glaze. Shocking Pink is a bright neon that dries matte. I also used it to create high bows on my thumb and ring finger. For a tutorial on my bows click here.
Since I recently purchased OPI's Matte Top Coat, I definitely wanted to try it out! I turned this look matte by first applying my trusty Seche Vite Top Coat which gave this design excellent shine. I only added this top coat to make sure my nails would last. When that dried, I counteracted the shine with the matte top coat that I was extremely impressed by. It made my nails matte within 8 seconds! I love this design even better matte, than I did when it was glossy.
Overall I think this design was a great choice for a nail art comeback. Neon and nude has been a very popular color scheme lately and it feels good to finally have it on my nails! Try this design yourself sometime and feel free to choose whatever neon color you want! I'd love to see this done with a highlighter yellow or bright blue! If you recreate this or any of my other designs, use the hashtag #inspiredbysabrinasnails on Instagram or send me the picture through Kik or Email and you could be featured on my Your Recreations page, here on my blog!

Thursday, July 11, 2013
Summer Neons Haul
Today I dropped by Sally's Beauty Supply for a little early birthday haul! I was on the mission for some bright colors and I must say.. mission accomplished!

.JPG)

.JPG)
.JPG)
Since it's summer time in California, bright colors are perfect for the season. For the last few months I've been stocking up on spring pastels, now it's time to collect neons! I already own a few, like China Glaze's Orange Knockout and I'm With the Lifeguard. But I have definitely been missing these beauties in my life!
The first polish I got was Glowstick by Orly. I've been wanting this perfect highlighter yellow ever since I saw it on the talented @Jewsie_Nails! I'm not sure exactly what occasion this polish will be appropriate for, but I'll find a nice design to pair with it one day! I'm in love with this color and can't wait to put it on.
Up next is Shocking Pink by China Glaze. A polish I can finally cross off of my wish list! This is the perfect bright pink and I think it will look nice both on nails and toes! No other pink polish I have compares to this gorgeous color.
I also purchased Turned Up Turquoise by China Glaze! This is a beautiful turquoise that also has a very slight shimmer to it. I'm excited to be wearing this and to be creating summer gradients with this color.
Lastly, I bought Purple Panic by China Glaze. I don't have anything similar to this creamy magenta color. It's a bit more pink than it is purple but it's still wonderful.
I'm so excited that I was able to purchase these polishes today! I can't wait to swatch them and use them in my designs. If you own any of these nail polishes, let me know what you think about them!
Subscribe to:
Comments (Atom)