

Showing posts with label Purple. Show all posts
Showing posts with label Purple. Show all posts
Monday, May 26, 2014
Subtle Polka Dots
Hey everyone! Sorry again for my absence, (I feel like I say this so often now!) this last month of school has been really stressful and I haven't had time to paint my nails. I seriously can't wait for summer, it feels like I haven't had time to relax in years. Anyways, yesterday I finally had time to paint my nails again. Keep reading to find out more!
Friday, May 9, 2014
Eugene Malibu Swatches & Review
Hey guys! Today I have some swatches from an indie nail polish line that is very new to me, Eugene Malibu! They recently sent me two of their polishes from their new Festival Collection to try out and I'm here today to share my thoughts with you. For more info on this indie brand, go to TheMonthlyNail.com and check them out!

Sunday, April 6, 2014
Pastel Galaxy Nails
It's the second to last day of my Spring Break and I feel like I want to cry! I've gotten so used to relaxing all day, I don't want to go back to having responsibilities. Haha but the good news is that I have new nails for you! Today I have some pastel galaxy nails that I love! I've tried traditional galaxy nails twice before but I wanted to add a twist to these. These pastel colors make this design perfect for Spring!

Thursday, March 27, 2014
Spring Polish Picks!
Happy Spring! Since the first day of Spring was a few days ago, I thought it was time to share my Spring Polish Picks with you all! Spring is one of my favorite times of the year because of the nice weather and pastel polishes ♥ Keep reading to find out what my favorite nail polishes are for this season!

Wednesday, January 29, 2014
Polishes I Received this Christmas!
Hey guys! I know Christmas was over a month ago but I never had the chance to show you all what polishes I received this past holiday. I'm so grateful for the friends and family that fed my polish addiction and I'm so excited to share my new pretties with you!
*Disclaimer* I am in no way trying to brag about things that were given to me. I simply want to share them with you and show you my collection as it grows. I love reading about what polishes people bought/ received so I thought this would be a good idea :) I also want to mention that this will be a picture heavy post!
To start, I'll show you polishes from one of my favorite brands, Essie! These polishes were given to me by my aunt, my friend Madi, and my mom!
 |
| From L to R: Off the Shoulder, Shake Your $$ Maker, Sable Collar & Using My Maiden Name |
Tuesday, January 28, 2014
Stars and Half Moons
Onto my nails, the other day I was browsing through Candice's lovely Instagram (@MrCandiiPants) and was completely inspired by her twist on half moons + a french tip! So inspired that I revolved my whole mani around them, adding stars for an extra touch of chic.

Saturday, November 2, 2013
Gradient Triangles
My sister and I decided to have a "Nail Painting Day" to paint our nails with a similar design. We decided on a design that we've been seeing everywhere on Instagram and Pinterest. There's no specific name for them but they look like triangles that start near the cuticle.


I started this design with two coats of white polish topped with Seche Vite for faster dry time. Since I used tape for this mani, I had to wait about an hour until the white polish was completely dry or else once the tape is added, it will pull polish up with it. Once the polish was dry, I added two strips of tape starting from the cuticle and meeting up with each other to create a triangle. I then applied a dark purple polish ( Spontaneous by China Glaze), a medium purple polish (Play Date by Essie), and a light purple polish (Sweet Hook by China Glaze) onto a cosmetic wedge and started to sponge it onto the nail. After a few coats of sponging and a coat of Fairy Dust by China Glaze, I carefully peeled the tape off to reveal crisp lines on the triangle. I added one coat of Seche Vite and Voila! They're finished!

As I mentioned earlier, my sister also did her nails but she decided to do a pink gradient instead of purple. She followed the exact same steps as I did but her dark pink polish was Mod Square by Essie, her medium pink polish was Boom Boom Room by Essie, and her light pink polish was Muchi Muchi by Essie. We both loved how these turned out and kept these on for as long as we possibly could (a little over a week)! If you try these out, use the hashtag #InspiredBySabrinasNails or send the picture to me though Email or Kik! I'll see you next time!

Saturday, October 12, 2013
Soothing Dreamcatchers
Not only do dreamcatchers help filter out bad dreams, but they also look really cute on your nails! I've seen dreamcatcher nails everywhere lately and decided to finally hop on the bandwagon! They were much simpler than I thought they would be and they turned out nicely along with a white to lavender ombre on the other nails.


The lavender color I used is Sweet Hook by China Glaze, it's a creamy light purple that is opaque in two coats. I also sponged on white for the ombre with Superstar! by Pure Ice and topped it off with Fairy Dust by China Glaze. To create the dreamcatcher I first used a black striper to create a half circle at the top of my nail and then filled it in with cross hatching. I also added three lines at different lengths to act as the string to hold all of the accessories on the dreamcatcher. Finally, I drew on pink and yellow beads and added brown feathers to complete the look! You can really customize these nails however you want, you change the background color, the amount of feathers and beads, and you can also change the design that goes inside of the half circle! If you try these out, use the hashtag #inspiredbysabrinasnails and tag me in the Instagram photo, or send me the picture through Kik or email! Have a great day!

Monday, September 23, 2013
Sephora By OPI Haul
Recently Sephora by OPI Nail Polish have been announced to be discontinued. As sad as that is, the good news is that they are all on sale for only $4.50! (Instead of their usual price of $9.00.) My mom took advantage of this sale and went to our local Sephora to pick up a few polishes for me. I told her that all I needed was a gold glitter polish but she came back with all of these beauties!

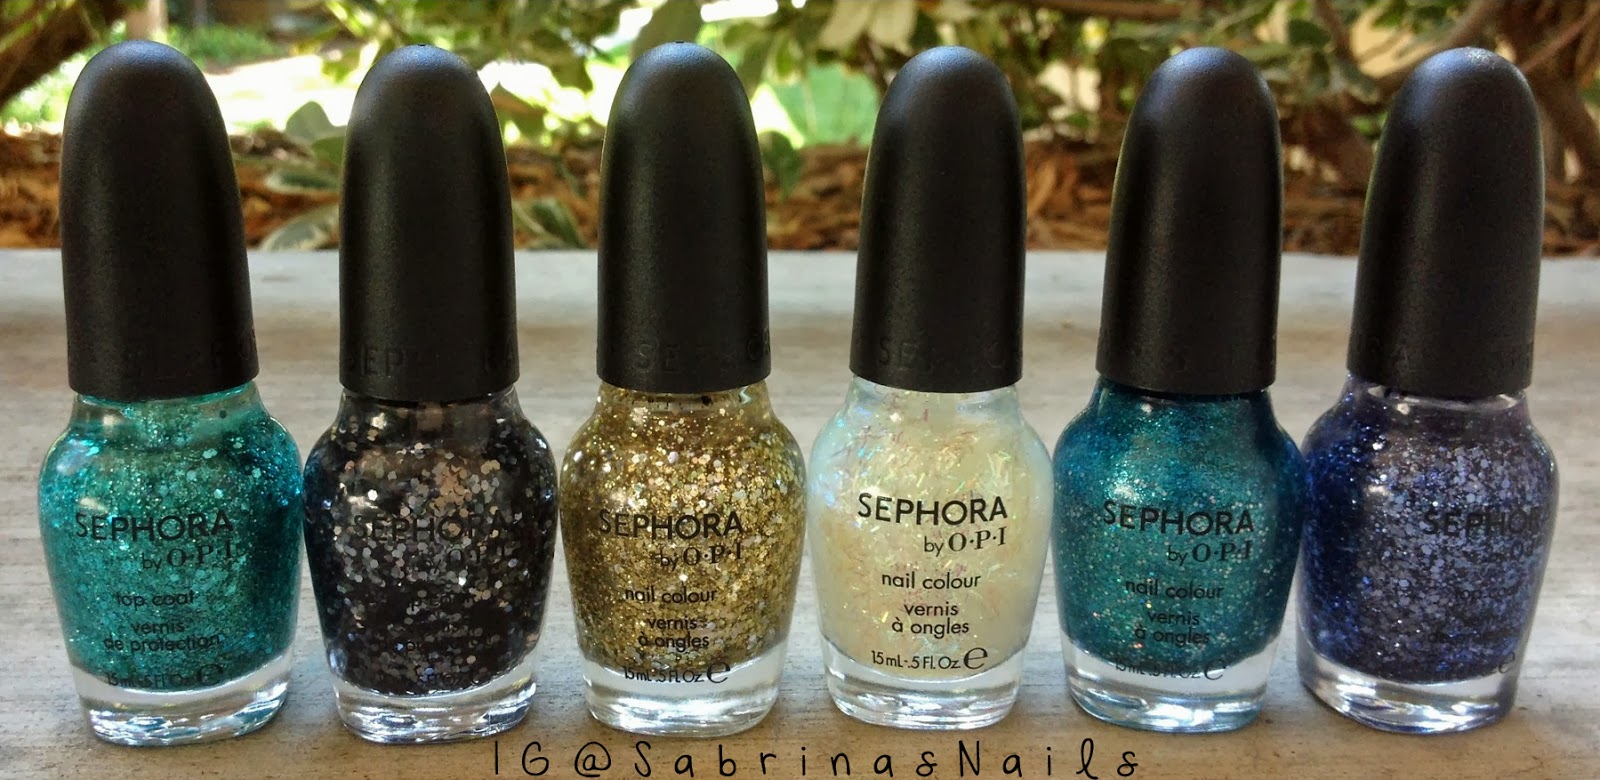 |
| (From L to R) Not Your Average Turquoise, To The Glitter End!, The Golden Age, Hollywood If I Could, I'm So Sari! and Indi-go With The Flow |
I'm in love with all of these and I can't wait to use them! I definitely recommend to check out the sale before all of the good colors run out! Have a nice day!
Matte Watermarble
After seeing @Mucking_Fusser do a watermarble design over a gradient the other day, I knew I had to try it! I'm definitely not as skilled as Corynn when it comes to watermarbling, but that doesn't mean I can't try!


I started off by creating a gradient on all of my nails. I applied Boom Boom Room by Essie (my all time favorite pink cream polish!) to the top of a makeup sponge, followed by Play Date by Essie to go underneath it. I then rolled and dabbed the sponge onto my nail to create this gradient effect!
Once the gradient dried, I used Superstar! by Pure Ice and Orly's Sec N Dry for the watermarble that I put on top of the pink & purple. Check out Corynn's blog www.MuckingFusser.com for in depth watermarle tutorials! I topped off the design with Seche Vite and cleaned up the excess polish on my fingers with cotton swabs and nail polish remover.
This design looks great when shiny but I did add one coat of OPI's Matte Top Coat to this because it made this easier to photograph because there were no glares! I really do love how this looks when matte and I love this design in general. I do have to admit that this took quite a long time, (about 3 hours for both hands + clean up) but if you tape your fingers, I'm sure the process would go by much faster!
I can't wait to try this design again with different color combinations and a more uniform watermarble! This mani will look good on almost every nail shape and length so please try it out! I hope you love this and have a fantastic day!
Wednesday, August 7, 2013
Flashy Lilac
My mind is still spinning from a One Direction concert I attended on Sunday, so I decided to have something simple yet cute on my nails. I recently bought my very first OPI nail polishes and I was very eager to try them for the first time today!


I began with four coats of You're Such A Budapest by OPI. This polish was surprisingly thin which was kind of a bummer, but the formula was very smooth which made up for it. You're Such A Budapest is a soft lilac color that is perfect for the spring and summer time. I would definitely wear this alone but I decided to add a touch of sparkle.
After letting this dry, I added one coat of Which Is Witch by OPI on top. I don't think I've said that I've added only one coat of something in a very long time, it's very refreshing! Which Is Witch is packed with holographic hex and bar glitters. This glitter top coat truly does sparkle like crazy when you're in the sunlight, it's going to bring you much attention!
I hope that you would all know by now that I am an absolute sucker for matte glitter. Not only is it easier to photograph, but it just adds something unexpected to any glitter mani. I finished this off with one coat of OPI's Matte Top Coat. A lot of you have been asking what the best matte top coat is, in my opinion this one by OPI is the best I've tried. It turns your nails matte right before your eyes in about 5 seconds, it's truly amazing! If you're looking for one that's more affordable, I would recommend NYC's Matte Me Crazy. It only costs a single dollar and it achieves similar results.
I hope I feel in the mood to do some nail art this week, I have some new polishes I want to try out! I hope you love this OPI combination, I know I do!
Tuesday, May 21, 2013
Chalkboard Nails
This weekend I decided to try something new and out of my comfort zone, Chalkboard Nails!


I think that all of ours came out so nicely and I am extremely happy that I had this opportunity! They are such nice girls and I can't believe I was lucky enough to do this, I have loved their nail art for the longest time! I encourage you to try chalkboard nails, they are super easy to personalize and are super fun and cute. If you try them, post them on Instagram, tag me and use the hashtag #inspiredbysabrinasnails. Or you can send me the picture through Kik or Email! Happy polishing!
For this design, I decided to go crazy and draw random doodles that I would draw if I had a chalkboard. I finally had a chance to use all of my colorful nail art stripers for this! I think these are so fun and very simple to do. I started of with a black nail polish, created wacky designs with my nail art stripers, and finished it off with a matte top coat.
I had seen chalkboard manis a lot on Instagram recently, but what really motivated me to try it was the fact that @NailMachine and @PamelaPomelo wanted to do triplet nails with this theme!
 |
| A collage of all of our nails! |
Friday, May 17, 2013
Target Haul
I went to Target yesterday and picked up a few polishes! The Target that I went to didn't have much of a selection, almost all of the Essie's were gone which was what I was looking forward to the most, so that was disappointing. But, I did buy some that I really love!
I bought two Loreal Polishes that I am so excited to add to my collection of Loreals! This is one of the best brands that I've tried, the polishes are creamy, opaque and super easy to work with. Loreal also has really nice pastel colors for Spring and I almost own all of them! On the left is a plain but gorgeous white called, I Will! I've been needing a new white polish because my old ones are starting to turn thick and goopy. On the left is Lacey Lilac which is a very unique shade of pastel purple, unlike any that I already own. These are so pretty and I can't wait to try them out!
The Sinful Colors section at my Target had some very bright and exciting colors that I had never seen before so I decide to purchase a few. Pink Forever is unlike any nail polish in my collection, once I brought it home I compared it to my other pink shades and there were none like it. Its a very bright, almost bubblegum pink color that is very pretty in the bottle and looks very opaque. Hazard is a bright coral/peach shade that definitely leans more toward orange than it does pink.
Loreal
.jpg) |
| I Will! Lacey Lilac |
Sinful Colors
.jpg) |
| Pink Forever Hazard |
Revlon
.jpg) |
| Coastal Surf |
Lastly I bought Coastal Surf by Revlon. I really love Revlon but this polish isn't the best. I opened the bottle in the store and it unfortunately had a funny looking brush with a few crazy hairs not in place, but it was the last one in the store so I decided to buy it anyway. I guess its partially my fault for still purchasing it but I couldn't resist! This shade of blue reminds me of Avenue Maintain by Essie but this one is a bit brighter. I really like it and I hope I can still apply this somewhat easily despite the funky brush.
Subscribe to:
Posts (Atom)