

Showing posts with label Gold. Show all posts
Showing posts with label Gold. Show all posts
Saturday, May 3, 2014
Girly Nautical Nails!
What's up beautiful people? Today I have some super cool nails inspired by the wonderful Karissa from @LifeIsBetterPolished on Instagram! I recently saw her do some really pretty nautical themed nails and I knew I had to recreate them. I haven't done anything like this before and I really love it!

Saturday, February 1, 2014
Julep - Zelda
Good morning everyone! Today I'm sharing with you a swatch of a new polish I got for Christmas. For the past few days I've been wearing Zelda by Julep. I can't wait to share my thoughts on this polish with you all!

Wednesday, January 29, 2014
Polishes I Received this Christmas!
Hey guys! I know Christmas was over a month ago but I never had the chance to show you all what polishes I received this past holiday. I'm so grateful for the friends and family that fed my polish addiction and I'm so excited to share my new pretties with you!
*Disclaimer* I am in no way trying to brag about things that were given to me. I simply want to share them with you and show you my collection as it grows. I love reading about what polishes people bought/ received so I thought this would be a good idea :) I also want to mention that this will be a picture heavy post!
To start, I'll show you polishes from one of my favorite brands, Essie! These polishes were given to me by my aunt, my friend Madi, and my mom!
 |
| From L to R: Off the Shoulder, Shake Your $$ Maker, Sable Collar & Using My Maiden Name |
Wednesday, December 25, 2013
Pink & Gold
Merry Christmas! :) I'm finally back to posting regularly on Instagram and on my blog because of Winter Break! These past few weeks of school have been stressful and I haven't really had time to do my nails (which is why I didn't do any holiday themed nails). But today after spending time with my family, I had time to paint my nails with two of my (29) new nail polishes that were gifted to me by my friends and family. (Anyone want to see all of my new pretties?)

Today I decided to go for something simple because of how beautiful these colors are on their own. My aunt bought me two new mini Color Clubs that I am really in love with. The first is Modern Pink. This polish was a little bit hard to work with because of how streaky it was, but after four coats I was able to even it out. The gold polish is called Take The Stage. This nail polish is a clear base with medium sized hex glitters and holographic flakes scattered through it as well. Since this polish has a clear base I think it works way better with undies (I used Sally Hansen's Golden-I).


Today I decided to go for something simple because of how beautiful these colors are on their own. My aunt bought me two new mini Color Clubs that I am really in love with. The first is Modern Pink. This polish was a little bit hard to work with because of how streaky it was, but after four coats I was able to even it out. The gold polish is called Take The Stage. This nail polish is a clear base with medium sized hex glitters and holographic flakes scattered through it as well. Since this polish has a clear base I think it works way better with undies (I used Sally Hansen's Golden-I).
Overall I'm really liking this combo, I think it's elegant but still fun because of the bright pink. I topped this mani off with one coat of Seche Vite. I hope y'all had a great time this holiday season and spent a lot of time with loved ones and even might've gotten some nice gifts! I'll see you next time!
Tuesday, November 19, 2013
Roses & Glitter Accents
I've recently been inspired by a few pink Essie colors in my collection. After staring at my polishes thinking of what design I could do, I was always drawn back to Muchi, Muchi, Boom Boom Room, and Mod Square, all by Essie! I finally decided on roses, and glitter gradients for my ring fingers.


I first painted my nails with four thin coats of Essie's Muchi, Muchi. This polish is sheer and sometimes hard to work with, but when you start to build a few layers of it, you get a smooth, light pink color! Once that dried, I took a large dotting tool and dipped it into Essie's Boom Boom Room. I placed three large dots toward the cuticle and let them dry. Next, I took Essie's Mod Square and a smaller dotting tool, to create the curved petals on the roses. With a dark green polish and the smallest dotting tool that I own, I made little tear drop shapes in arbitrary areas around the roses to act as leaves! The nail looked empty with just roses on it so at the last minute I took my white striper by Stripe Rite and created vertical lines on my nail. If stripes were to originally be in my design, I would've done them first to avoid accidentally overlapping the roses!
I was really interested to play around with Jetset In My Sunset by Curtsy and Bow. After swatching it on a piece of paper to see how much glitter I could get in one stroke, I realized that the formula on this polish wasn't so great. With one swipe, I got about two pieces of glitter, which is a shame because the gold hex glitters are gorgeous! After experimenting with this polish, I realized that I could create a glitter placement gradient (that's a mouthful) on my ring finger!
I began by dumping some of the polish out on a piece of paper (aka an old magazine I found lying around). With a toothpick, I grabbed each glitter individually and placed them heavily toward the cuticle of my nail. The further down I went, the less glitter I would add, until it looked like a gradient! The clear base in this polish helped the glitter stick to my nail. If you're using completely loose glitter, add a topcoat on your nail (to help the glitter adhere to your nail) and also dip your toothpick in topcoat to make the process of picking up glitter much easier!
I hope you liked this design as much as I did and I hope you try it out for yourself! If you do, use the hashtag #InspiredBySabrinasNails or send me a picture through Kik or Email! Thank you and have a lovely week (:
Sunday, November 10, 2013
Reviewing Curtsy and Bow Polishes
Recently I was contacted by Curtsy and Bow to review a few of their gorgeous nail polishes! I'd been a fan of their polishes for a while and was extremely thankful for this opportunity! After a short two day of making the arrangement, a package came in the mail with three full size bottles of their polishes, along with a lovely note!
I'm so excited to try these out, they are all so pretty and that is my favorite shade of blue! If you'd like to purchase any of these or see more of their products, go to www.CurtsyandBow.com!

 |
| From Left to Right: Jetset In My Sunset, St Thomas Blue Me Away & Shiraz With Tha Stahz |
Sunday, October 20, 2013
Floral + Stripes
Today's blog post is dedicated to a cute floral and striped mani! I found inspiration from a photo I saw on Pinterest and I decided to recreate the roses and ended up with a fun and detailed design!


I started off this mani with Royally Yours by L'oreal on all of my nails except for the ring finger, a light and dusty blue color that was opaque in three coats. On my thumb and pinkie finger I added vertical stripes with a white striper. On the pointer and middle finger I carefully painted white (acrylic paint) and pink (Boom Boom Room by Essie) roses with a thin nail art brush and topped it off with curly green (acrylic paint) stems! Lastly, on my ring finger I started off with a base of gold polish (Golden-I by Sally Hansen) and added two coats of a chunky gold glitter polish (The Golden Age by Sephora by OPI [RIP]). To complete the look, I added one coat of my trusty Seche Vite topcoat! If you like this mani, feel free to tell me in the comments of this post or on Instagram! If you want to try it out for yourself, use the hashtag #InspiredBySabrinasNails or Kik me the photo of your results! See you next time!

Monday, September 23, 2013
Sephora By OPI Haul
Recently Sephora by OPI Nail Polish have been announced to be discontinued. As sad as that is, the good news is that they are all on sale for only $4.50! (Instead of their usual price of $9.00.) My mom took advantage of this sale and went to our local Sephora to pick up a few polishes for me. I told her that all I needed was a gold glitter polish but she came back with all of these beauties!

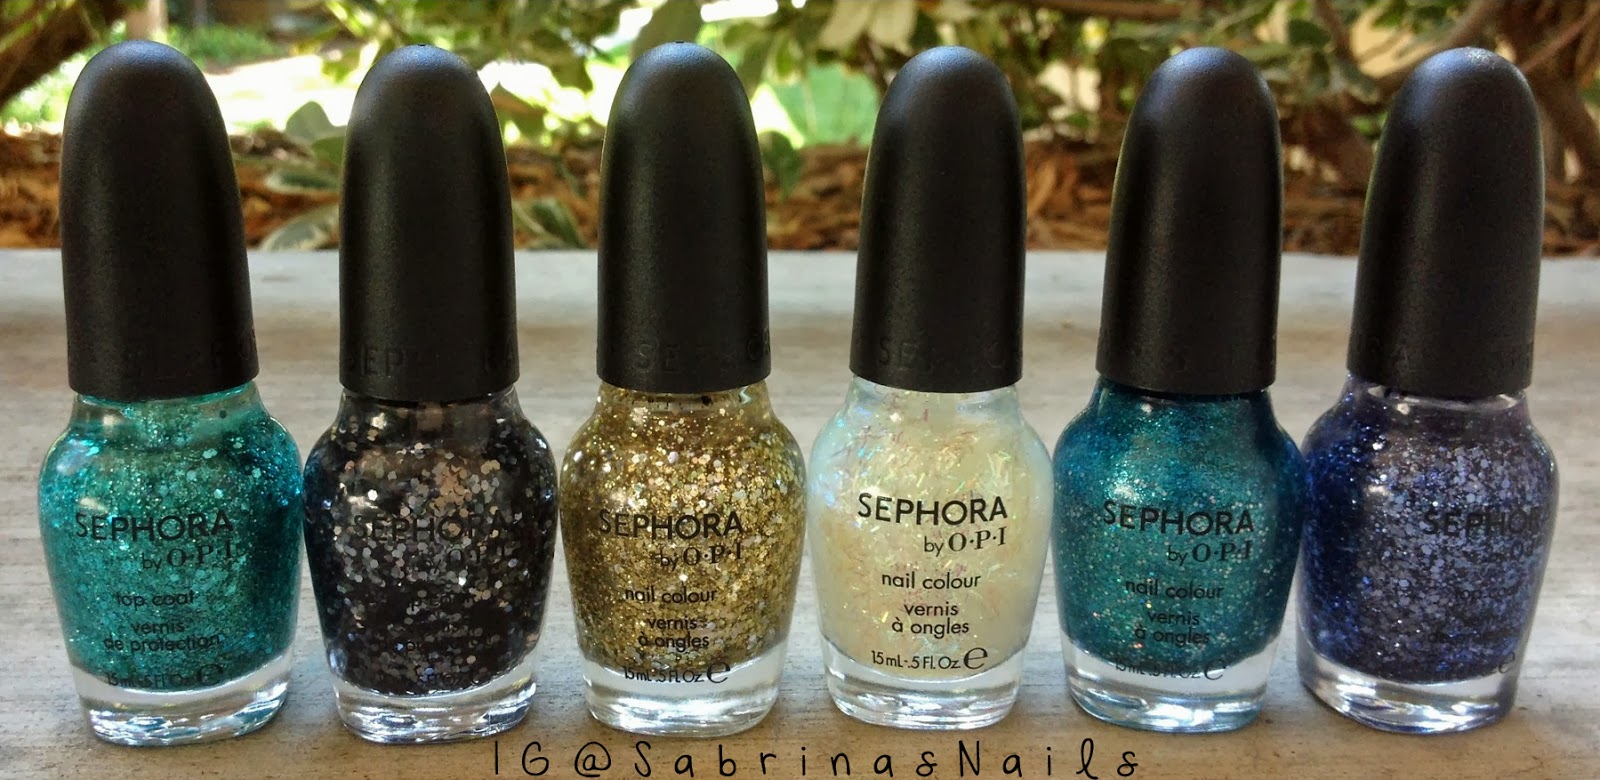 |
| (From L to R) Not Your Average Turquoise, To The Glitter End!, The Golden Age, Hollywood If I Could, I'm So Sari! and Indi-go With The Flow |
I'm in love with all of these and I can't wait to use them! I definitely recommend to check out the sale before all of the good colors run out! Have a nice day!
Tuesday, July 23, 2013
Freak Show Polish: Circus of the Sun
Circus of the Sun is a shimmery orange polish with bright orange glitters mixed inside as well. This polish reminds me of gold and I couldn't wait to put it on!
.JPG)


+copy.jpg)
.JPG)
+copy.jpg)
.JPG)
.JPG)
I first applied 4-5 coats of Let's Meet by Sinful Colors. I would usually wear this polish as a topper but I really didn't mind the building up of coats which others might find annoying. I really love the outcome, it feels like I'm wearing the sun on my nails! I haven't worn a bright color like this in a while and it feels great!
I probably should've worn a more orange base but this one looked fine under two coats of Circus of the Sun. I love the way this looks, it makes my nails feel like summer!
Besides my awkwardly chipped nail, this polish looks amazing up close!
Here is my rating of this polish:
Application: Very easy to apply even though the brush to my sample bottle popped off of the cap :(
True to Color: Completely true to color.
Dry Time: 2-4 minutes.
Consistency: Smooth, not clumpy or goopy.
Coats Until Opaque: On its own probably 3-4 coats.
Additional Comments: If you want to feel like you have gold on your nails, get this nail polish!
Final Rating: 8/10
To purchase, visit FreakShowPolish.com or visit Carissa's Instagram (Instagram.com/FreakShowPolish) to view more swatches and polishes!
Friday, May 17, 2013
Braided Nails Pictorial
Here's the pictorial for the Braided Nails that I posted on here and on my Instagram! Many of you requested this so I decided to take pictures of my process and share! Sorry for the large watermark on this, it's the only way I can somewhat still get credit from thieves!

Start off by choosing your three colors that you want to use in this design. I chose a coral color, (Coral Reef by Sally Hansen,) a Light Pink shade, (Easy Going by Sinful Colors,) and a gold polish, (Golden-I by Sally Hansen.)
- I started off with the coral polish as my base.
- Next I got my gold polish, started at the edge of my nail and swiped it across diagonally to create the first part of the braid.
- With the light pink polish I started from the other edge of my nail and swiped diagonally to the right, overlapping the gold to create a triangle looking shape with the coral color.
- Now using the coral again, I'm going back to the right side and swiping the brush across, overlapping the pink shade.
- It's time to go back with the gold, start from the opposite edge and swiping the brush to the right to continue the braid.
- Going back with the light pink, I continued the braid.
- Using the coral I swiped the brush from left to right diagonally.
- The braid is now starting to end, using the gold I repeated the last few steps.
- Finally with the light pink I finished off the braid, making sure that my line is as neat as possible because it will be fully shown.
Braided Nails
This is my second attempt at braided nails and they aren't so bad if I do say so myself! I really didn't know what to add on top of Coral Reef after I swatched it the other day and I thought that this would be perfect! The color scheme was a bit tricky to figure out but I ended up choosing a light pink, Easy Going by Sinful Colors and a shimmery gold color, Golden-I by Sally Hansen.
.jpg)
.jpg)
.jpg)
I still have a tremendous amount of trouble making each part of the braid even, some of my lines are shaky and it is something I still have to work on.
I also have a problem with this design because it tends to get rather thick. To achieve the braided nails, you have to keep layering the three different colors of nail polish, so by the time I get to the last few strands of the braid, it is extremely thick. So thick that even my trusty Seche Vite topcoat can't smooth it out.
These nails unfortunately took hours to dry and have already had many dents in them and now as I'm typing this, are all pretty much ruined. But they were super pretty while they lasted and I was able to take some pretty snazzy photographs of them! I'll have to practice this design more often until I master it and I'll be posting a pictorial on both here and on my Instagram soon just in case YOU would like to recreate these too!
Subscribe to:
Posts (Atom)